Tutorials

MONAI Physio tutorials
From a CT scan to an animated digital twin
Eighteen numbered stages across 36 Python scripts, 21 of them runnable
today: the fifteen duke_heart variants wait on a dataset
that is being released soon.
Each one drives the real workflow classes end-to-end on downloadable
data, shows what it produced, and ends with the handful of constants
to change so it runs on your own scans. New to the toolkit? Tutorial 00
is a self-contained demo notebook that runs the whole lung pipeline
from a single clone, with no earlier tutorial required.
Before You Start
1. Get the scripts. They ship with the source repository, not with the pip
package - pip install monai-physio gives you the library and the
monai-physio-* commands but no tutorials/ directory:
git clone https://github.com/Project-MONAI/monai-physio.git
cd monai_physio
See Quick Start for version-matched clones and the release tarball link.
Each numbered tutorial below may ship one to three organ/dataset variant
scripts - heart, lung, and duke_heart - that share the same
workflow class and the same numbered section; where a variant’s data, output
path or behaviour differs from the others, that section’s Script and
Adapt to your data blocks call it out inline.
2. Get the data, running every download from the top level of the clone.
The tutorials resolve their inputs against the repository root
(<repo>/data/<dataset>), while the CLI writes to data/<dataset>
relative to the current working directory:
monai-physio-download-data Slicer-Heart-CT --directory data/Slicer-Heart-CT
monai-physio-download-data KCL-Heart-Model --directory data/KCL-Heart-Model
monai-physio-download-data Chest-CT --directory data/Chest-CT
monai-physio-download-data TCIA-4DLung --directory data/TCIA-4DLung
monai-physio-download-data PhysicsNeMo-MGN-Lung-Motion --directory tutorials/network_weights
That covers Heart Tutorials 1, 3, 4 and 6 (Slicer-Heart-CT and
KCL-Heart-Model), Lung Tutorial 7 (Chest-CT, which Tutorial 13 also
animates), and Lung Tutorials 1, 2, 3, 4, 6, 8, 10, 11 and 12
(TCIA-4DLung, a converted tutorial subset of the full TCIA 4D-Lung
collection). The full collection is obtained separately, by downloading its
DICOM series from TCIA and running data/TCIA-4DLung/convert.py, if more
than the tutorial subset is needed. DirLab-4DCT, used by Heart Tutorial
7, is not auto-downloaded: DIR-Lab distributes each case individually
and may require registration. PhysicsNeMo-MGN-Lung-Motion fetches the
pretrained lung-motion checkpoint Tutorial 9 otherwise trains, letting a
reader skip Tutorial 9 and start directly at Tutorial 10 (and the chain of
Tutorials 11 through 14, which build on Tutorial 10’s output).
Tutorials 5 and 9 need no dataset of their own; they consume the outputs of
Tutorials 4 and 8. Duke-Heart-4DLabelmaps drives the fifteen duke_heart
variants: a fourteen-tutorial chain from Tutorial 4 through Tutorial 18, plus
the separate, optional Tutorial 2 ICON finetuning variant; the dataset is
being released soon, and until then access can be requested from Stephen Aylward
(saylward@nvidia.com). See data/TCIA-4DLung/README.md,
data/DirLab-4DCT/README.md, data/Duke-Heart-4DLabelmaps/README.md, and
Download Example Data for every dataset’s size and source.
3. Know where output lands. Every tutorial writes to
tutorials/output/<tutorial_name>/ and reuses what it finds there, so a
second run is cheap and later tutorials pick up earlier results automatically.
Predict Lung Motion From a Single Chest CT
A self-contained demo: fit the shape model and predict motion with a pretrained network, nothing else to run first.
01Gated 4D CT to Animated USD
Segment, register and assemble a 4D CT series into an animated OpenUSD scene.
02Finetune ICON Registration
Adapt uniGradICON to your own cohort and measure what the finetuning bought you.
03Reconstruct High-Resolution 4D CT
Register every phase to one reference and reconstruct the series at its resolution.
04CT Segmentation to VTK Surfaces
Segment one CT phase and export patient anatomy as VTK PolyData surfaces.
05VTK Surfaces to Animated USD
Convert meshes into a time-sampled USD scene for Omniverse playback.
06Create a PCA Shape Model
Turn a population of meshes into a statistical shape model and its modes.
07Fit the Shape Model to a Patient
Fit the shape model to one ungated clinical scan, PCA coefficients and all.
08Propagate the Model Through 4D
Fit each case at its reference phase and carry the mesh through every phase.
09Train a PhysicsNeMo Surrogate
Train a MeshGraphNet to predict per-vertex motion from shape and phase.
10Predict Motion With the Surrogate
Replace the registration solve with one forward pass, then export to USD.
11Score the Surrogate Against the Images
Volume and surface RMSE per lobe, plus Dice per chamber, on the held-out case.
12The Whole Inference Pipeline in One Script
Go from a gated series to an animated prediction without registering a single phase.
13Breathe and Beat a Static Clinical CT
Animate one ungated breath-hold scan with both rhythms, from two networks at once.
14Sweep the Shape Parameters
Re-infer and rescore over a grid of PCA coefficients, to see how far the motion moves with them.
15Leave-One-Out Cross-Validation
Rebuild the model, refit, retrain and rescore once per fold, for a spread rather than a number.
16Build a Volumetric Shape Model of the Myocardium
Fill the mean surface with tetrahedra so a strain energy has a deformation gradient to act on.
17Train a Mechanics-Aware Cardiac Motion Surrogate
Add a neo-Hookean strain energy to the displacement loss, and train an unweighted ablation to isolate it.
18Predict Myocardial Motion and the Stress It Implies
Score the physics-informed surrogate against its ablation and export the motion colored by von Mises stress.
Recommended Run Order
Tutorials are straightforward Python scripts: run one with
python tutorials/tutorial_01_heart_gated_ct_to_usd.py, or open it in your
editor and read it top to bottom. Numbers 1, 4 and 5 are the fastest way to see
the toolkit
work end-to-end; 6 through 18 build the statistical-model and AI-surrogate
pipeline on top. Tutorial 00 sits outside this chain - a notebook demo that
downloads everything it needs and predicts lung motion end-to-end on its own.
Tutorial 1 - after downloading Slicer-Heart-CT.
Tutorial 2 - after obtaining TCIA-4DLung. It writes the finetuned ICON weights Tutorial 8 uses when present; optional if stock weights are acceptable.
Tutorial 3 - after obtaining its dataset; it registers with Greedy and needs no finetuned weights.
Tutorial 4 - after downloading Slicer-Heart-CT.
Tutorial 5 - after Tutorial 4, whose surfaces it converts.
Tutorial 6 - heart needs KCL-Heart-Model, lung needs TCIA-4DLung.
Tutorial 7 - after Tutorial 6; the lung variant also needs Chest-CT.
Tutorial 8 - after Tutorial 6 (lung); Tutorial 2 optional.
Tutorial 9 - after Tutorial 8, whose fitted meshes it trains on.
Tutorial 10 - after Tutorial 9, whose checkpoint it loads.
Tutorial 11 - after Tutorial 9. The lung variant segments every gated frame of the held-out case, so it needs a GPU and the segmentation weights.
Tutorial 12 - after Tutorial 6 and Tutorial 9 for its anatomy; it fits the model to the patient itself, so nothing is read from Tutorial 8.
Tutorial 13 - after Tutorial 7 (lung) and Tutorial 9 for both anatomies. It also needs Simpleware Medical, which segments the heart it fits.
Tutorial 14 - after Tutorial 8 and Tutorial 9, whose fit and checkpoint every point of the grid reuses. It scores each point the way Tutorial 11 does, so it needs a GPU and the segmentation weights too.
Tutorial 15 - needs only the cohort. It rebuilds the shape model, the fits and the network per fold, so nothing from Tutorials 6, 8 or 9 is read; those outputs are reused as a cache when they happen to be there.
Tutorials 16, 17 and 18 (Duke heart) - in that order, after Tutorial 4. They branch off the chain rather than continuing it: a strain energy needs volume elements, so Tutorial 16 rebuilds the shape model tetrahedrally instead of reusing the surface one from Tutorials 6 to 8. Tutorial 17 then trains against that energy and Tutorial 18 scores it and reads out stress.
Tutorial 00 (Lung Demo): Predict Lung Motion From a Single Chest CT
- Script
tutorials/tutorial_00_lung_demo.ipynb- Workflow
WorkflowFitStatisticalModelToPatientandWorkflowInferMovement(process_time_series) driving a pretrainedWorkflowInferPhysicsNeMoMeshGraphNet, withSegmentChestTotalSegmentator.- Dataset
Chest-CT (auto-download): a single ungated chest CT, unlike the gated series the numbered tutorials use. The pretrained PhysicsNeMo-MGN-Lung-Motion checkpoint (auto-download) ships its own PCA shape model, so no Tutorial 6 or Tutorial 9 run is needed first.
- Requirements
GPU, for segmentation and the MeshGraphNet forward pass.
- Preview
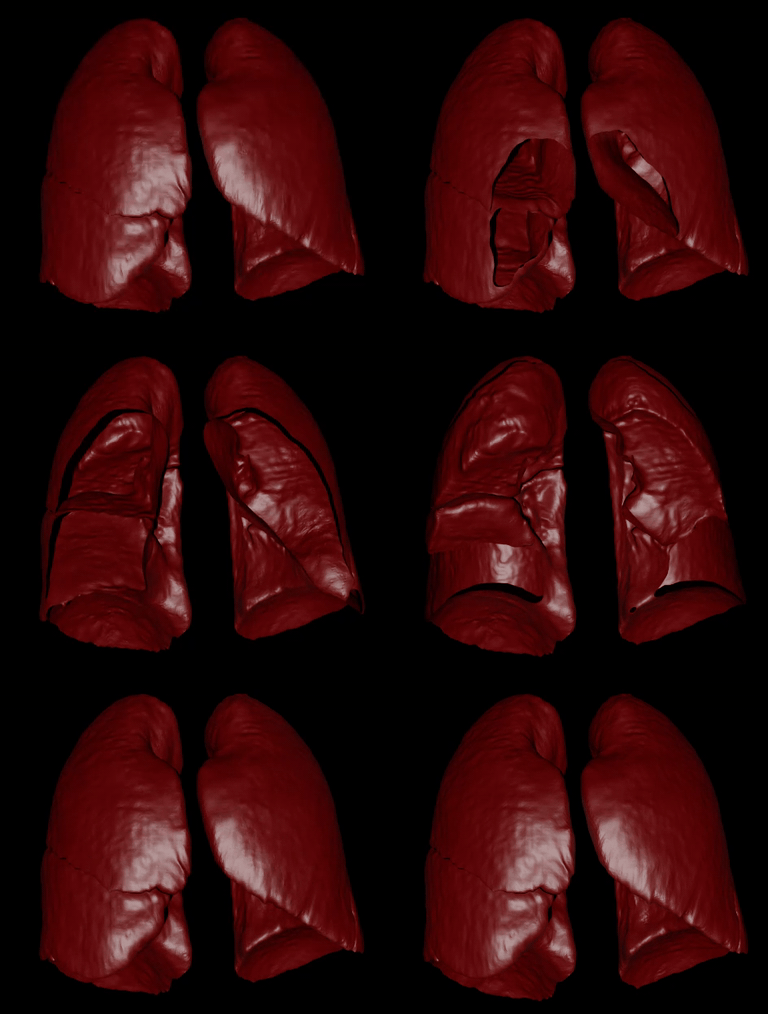
Predicted lung motion across the demo respiratory-stage grid.
- Inner API usage
fit_workflow = WorkflowFitStatisticalModelToPatient(
    template_model=pca_mean_surface,
    patient_models=[lung_surface],
    patient_image=patient_image,
    patient_labelmap=lung_labelmap,
)
fit_workflow.set_use_pca_registration(
    use_pca_registration=True,
    pca_model=pca_model,
    number_of_pca_components=number_of_pca_components,
    use_surface=False,
)
fit_result = fit_workflow.process()

infer_workflow = WorkflowInferPhysicsNeMo(model_directory=model_dir)
infer_result = WorkflowInferMovement(infer_workflow).process_time_series(
    shape_parameters=pca_coefficients_file,
    stages=stages,
    output_directory=output_dir,
    fitted_reference_mesh=fitted_reference_mesh_file,
    reference_image=patient_image,
    anatomy_type="lung",
)
- Run
jupyter notebook tutorials/tutorial_00_lung_demo.ipynb
- Outputs
The per-stage warped CTs, predicted VTP surfaces, and one animated USD, under
tutorials/output/tutorial_00_lung_demo/.- Adapt to your data
Swap the downloaded
Chest-CTvolume for your own ungated chest CT, and pointmodel_dirat a different lung-motion checkpoint - either the one Tutorial 9 trains, or another pretrained lung checkpoint whose directory also carries a matchingpca_model.jsonandpca_mean_surface.vtp- to demo a different cohort. Demoing another anatomy needs more than swappingmodel_dir: the segmenter (SegmentChestTotalSegmentator) andanatomy_type="lung"passed toprocess_time_seriesare hardcoded to lung and must change too. This is a standalone shortcut, not step one of the numbered series: start at Tutorial 1 for the full pipeline.
Tutorial 1: Gated 4D CT to Animated USD
- Script
tutorials/tutorial_01_heart_gated_ct_to_usd.py(Slicer-Heart-CT)tutorials/tutorial_01_lung_gated_ct_to_usd.py(TCIA-4DLung)tutorials/tutorial_01_lung_gated_ct_to_usd_tetmesh.py(TCIA-4DLung) - fills the reference-phase lung surface with tetrahedra and warps that one volume mesh through every phase’s registration instead of exporting a surface-only USD, so every frame shares the reference mesh’s connectivity - needed for downstream finite-element work (e.g. strain energy) that a surface cannot support.- Workflow
WorkflowConvertImageToUSD, drivingRegisterImagesGreedyand aSegmentAnatomyBasesubclass.- Dataset
Slicer-Heart-CT (auto-download) for the heart, TCIA-4DLung (auto-download) for the lung. The phase roughly 70% through the series is the segmentation and registration reference.
- Requirements
Greedy registers every phase against the reference on the CPU; a GPU is still needed for segmentation.
- Preview
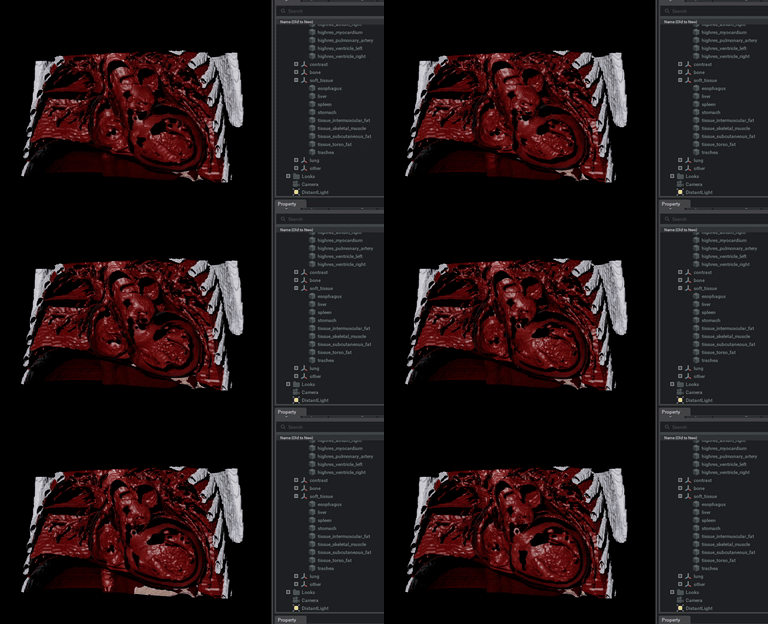
The animated cardiac model, played back in Omniverse.
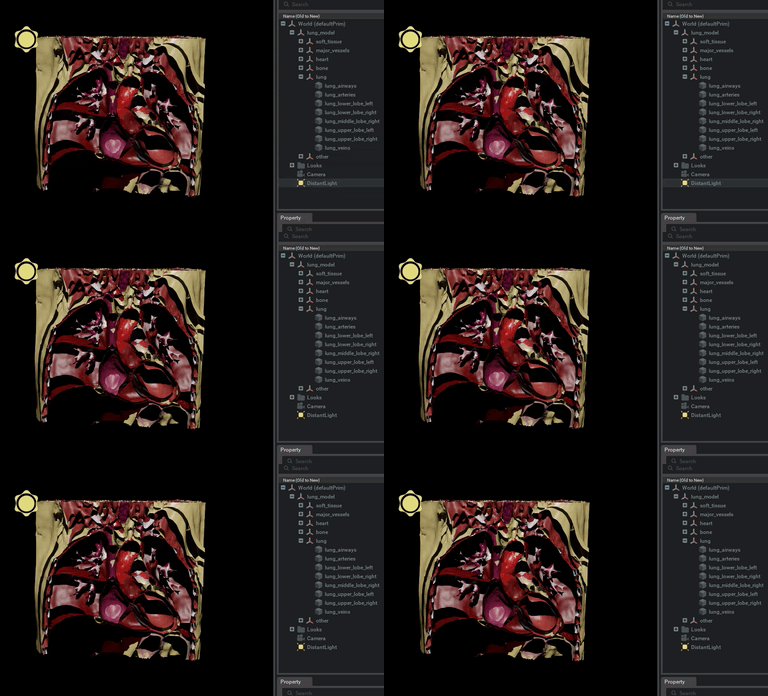
The same workflow on a TCIA-4DLung respiratory series.
- Inner API usage
workflow = WorkflowConvertImageToUSD(
    time_series_images=time_series_images,
    reference_image=reference_image,
    output_directory=str(output_dir),
    usd_project_name="cardiac_model",
    registration_method=registration_method,
    segmentation_method=segmentation_method,
    save_assets=True,
)
workflow_results = workflow.process()
- Run
python tutorials/tutorial_01_heart_gated_ct_to_usd.py
python tutorials/tutorial_01_lung_gated_ct_to_usd.py
python tutorials/tutorial_01_lung_gated_ct_to_usd_tetmesh.py
- Outputs
The animated USD named after
usd_project_name, the per-phase registered volumes and labelmaps, and screenshots - all undertutorials/output/tutorial_01_{heart,lung}/. The tetmesh variant instead writes onelung_tetmesh_<phase>.vtuper respiratory phase, plus a reference-surface screenshot, undertutorials/output/tutorial_01_lung_tetmesh/.- Adapt to your data
Point
data_dirand the file glob near the top of the script at your own series: any set of 3D volumes ITK can read (.mha,.nrrd,.nii.gz) in acquisition order, or a 4D.seq.nrrdsplit first withmonai-physio-convert-image-4d-to-3d. Choose the reference phase by changing the index expression, and swapsegmentation_methodfor the one matching your anatomy and contrast - see Segmentation Modules. For command-line use without editing code, runmonai-physio-convert-image-to-usd(Heart Gated CT Processing). The tetmesh variant points at the same data via the same knobs; tetrahedra repair for inverted or degenerate elements runs automatically per phase.
Tutorial 2: Finetune ICON Registration
- Script
tutorials/tutorial_02_lung_finetune_icon.pytutorials/tutorial_02_lung_distancemap_finetune_icon.py- the lung distance-map variant, which finetunes on distance maps rather than image intensities so the labelmap-to-labelmap stage of Tutorials 7 and 8 has in-distribution weights.tutorials/tutorial_02_duke_heart_distancemap_finetune_icon.py- the same for the heart, on Duke-Heart-4DLabelmaps. The heart needs its own run because it registers with a much tighter mask than the lungs, so its distance maps saturate over a shorter radius and do not share an intensity distribution with lung ones. The per-organ values live intutorials/parameters_tcia_4d_lung.pyfor the lung variant andtutorials/parameters_duke_heart_labelmaps.pyfor this one. This is aduke_hearttutorial: Duke-Heart-4DLabelmaps is being released soon (see Before You Start), and until then access can be requested from Stephen Aylward (saylward@nvidia.com) - seedata/Duke-Heart-4DLabelmaps/README.md.- Workflow
WorkflowFinetuneICONRegistration, thenRegisterImagesGreedyandRegisterImagesGreedyICONto score the result, withSegmentNVSegmentCTMRIsupplying the labelmaps.- Dataset
TCIA-4DLung (auto-download). Every case except
100_HM10395trains;100_HM10395is held out and registered three ways - Greedy alone with its defaults, then Greedy+ICON with the stock uniGradICON weights and with the finetuned ones - so the improvement is measured, not asserted.- Scoring
The fixed image is segmented once, and each registered moving image is segmented again after warping. The table reports the mean, 5th percentile, median, 95th percentile, minimum and maximum of the per-class Dice scores, plus the mislabeled voxel count, with the unregistered moving image as a reference row. Segmenting each warped volume separately costs one GPU segmentation per method and folds segmentation variability into the scores.
- Requirements
GPU required. 100 epochs over nine cases: the longest-running tutorial before the AI-surrogate chain. The experiment directory is cleared on every run, so it does not resume.
- Preview

The held-out case scored per method - unregistered, Greedy, Greedy+ICON with the stock weights, and with the finetuned weights.
- Inner API usage
workflow = WorkflowFinetuneICONRegistration(
    subject_image_files=list(subject_image_files.values()),
    output_dir=weights_dir,
    finetune_name=finetune_name,
    subject_ids=list(subject_image_files.keys()),
    epochs=epochs,
    dice_loss_weight=0.0,
)
weights_path = workflow.process()
- Run
python tutorials/tutorial_02_lung_finetune_icon.py
python tutorials/tutorial_02_lung_distancemap_finetune_icon.py
- Outputs
The finetuned checkpoint under
tutorials/network_weights/icon_tcia_4dlung/, plusregistration_summary.csv, the fixed-minus-registered difference images (residual structure is what separates the methods), the fixed and warped labelmaps, and before/after screenshots intutorials/output/tutorial_02_lung/.- Adapt to your data
Replace the training cohort glob with your own volumes and set
epochsto fit your budget - the workflow needs only a list of image files and matching subject ids. Raisedice_loss_weightabove0.0when you also have labelmaps to supervise with. Load the resulting weights anywhere by passing them toRegisterImagesICON.
Tutorial 3: Reconstruct High-Resolution 4D CT
- Script
tutorials/tutorial_03_heart_reconstruct_highres_4d_ct.pytutorials/tutorial_03_lung_reconstruct_highres_4d_ct.py- Workflow
- Dataset
Slicer-Heart-CT for the heart; TCIA-4DLung for the lung, which reconstructs against its g070 (end-exhale) phase - the same reference Tutorial 8 fits to.
- Requirements
CPU is enough. One coarse-to-fine registration per phase, greedy schedule
[30, 15, 7, 3].- Preview
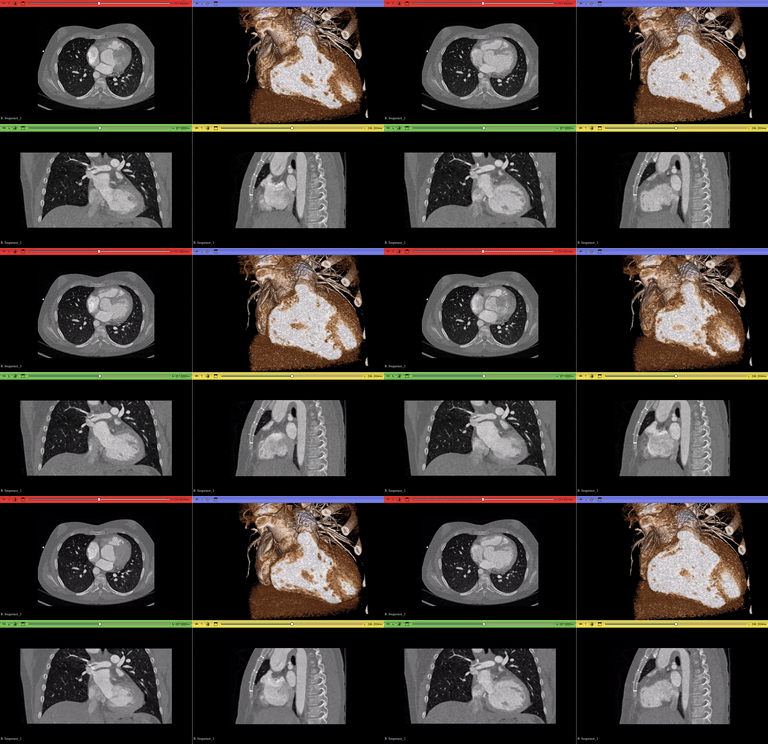
The acquired cardiac phases.
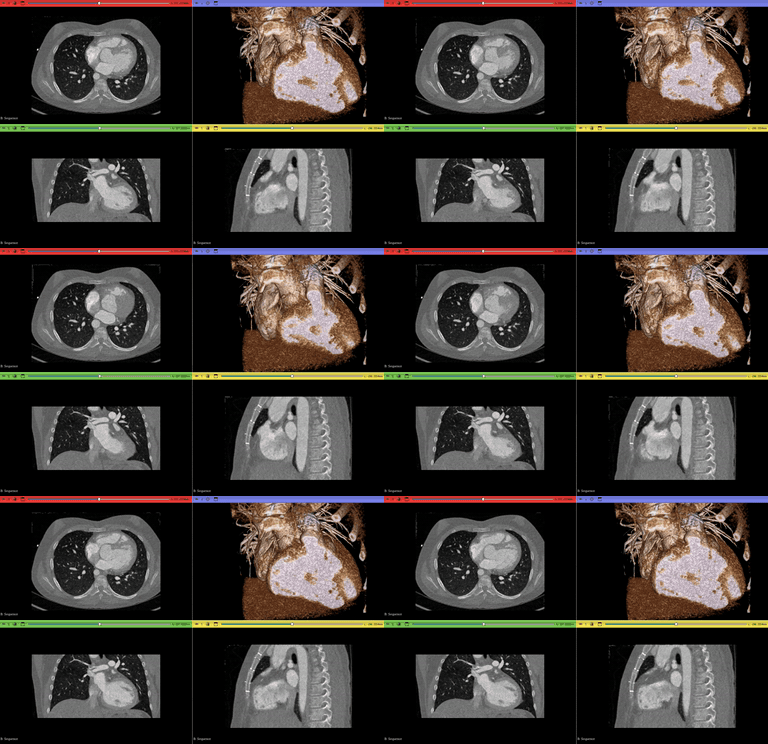
The same phases reconstructed at the reference resolution.
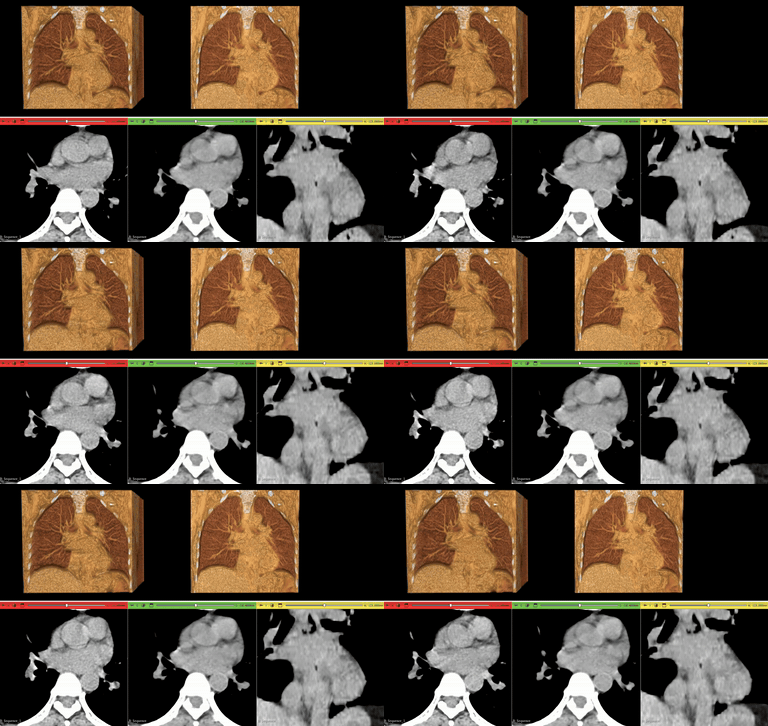
Side by side on the lung series.
- Inner API usage
registration_method = HEART_CT_KCL.registrar(test_mode, log_level=log_level)

workflow = WorkflowReconstructHighres4DCT(
    time_series_images=time_series,
    reference_image=reference_image,
    reference_time_frame=reference_time_frame,
    registration_method=registration_method,
)
workflow.set_modality("ct")
result = workflow.process()
- Run
python tutorials/tutorial_03_heart_reconstruct_highres_4d_ct.py
python tutorials/tutorial_03_lung_reconstruct_highres_4d_ct.py
- Outputs
reconstructed_frame_<i>.mhaplus fixed_to_moving and moving_to_fixed transforms for every phase, and two screenshots, undertutorials/output/tutorial_03_{heart,lung}/.- Adapt to your data
Set
case_globanddata_dirto your series and pick the reference withreference_time_frame. If you have a separate breath-hold or contrast-enhanced volume, pass it asreference_imageinstead of one of the phases - that is what the workflow is really designed for. The iteration schedule comes fromHEART_CT_KCL.registrar(test_mode, ...), which already shortens it for a fast smoke test whentest_modeis set. The saved.hdftransforms are reusable:ProcessTransformsapplies them to meshes and labelmaps.
Tutorial 4: CT Segmentation to VTK Surfaces
- Script
tutorials/tutorial_04_heart_ct_to_vtk.pytutorials/tutorial_04_lung_ct_to_vtk.pytutorials/tutorial_04_duke_heart_labelmap_to_vtk.py- starts from gated labelmaps rather than CT, and also extracts tetrahedral meshes. Needs Duke-Heart-4DLabelmaps (see Before You Start).- Workflow
WorkflowConvertImageToVTKwithSegmentChestTotalSegmentatorWithContrast(heart) orSegmentChestTotalSegmentator(lung).- Dataset
One frame of Slicer-Heart-CT or TCIA-4DLung - a single static volume is enough.
- Requirements
GPU recommended for segmentation; no registration, so this is the quickest way to confirm your environment and model weights work.
- Preview
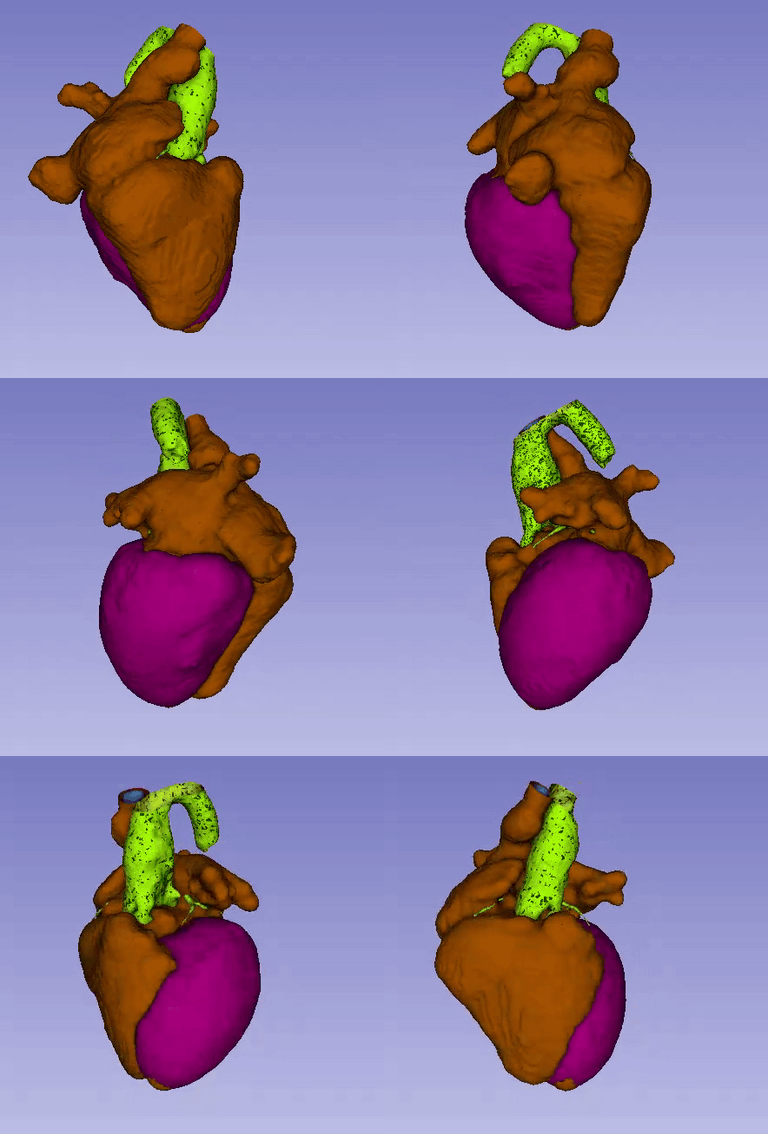
Cardiac anatomy surfaces exported from one CT phase.
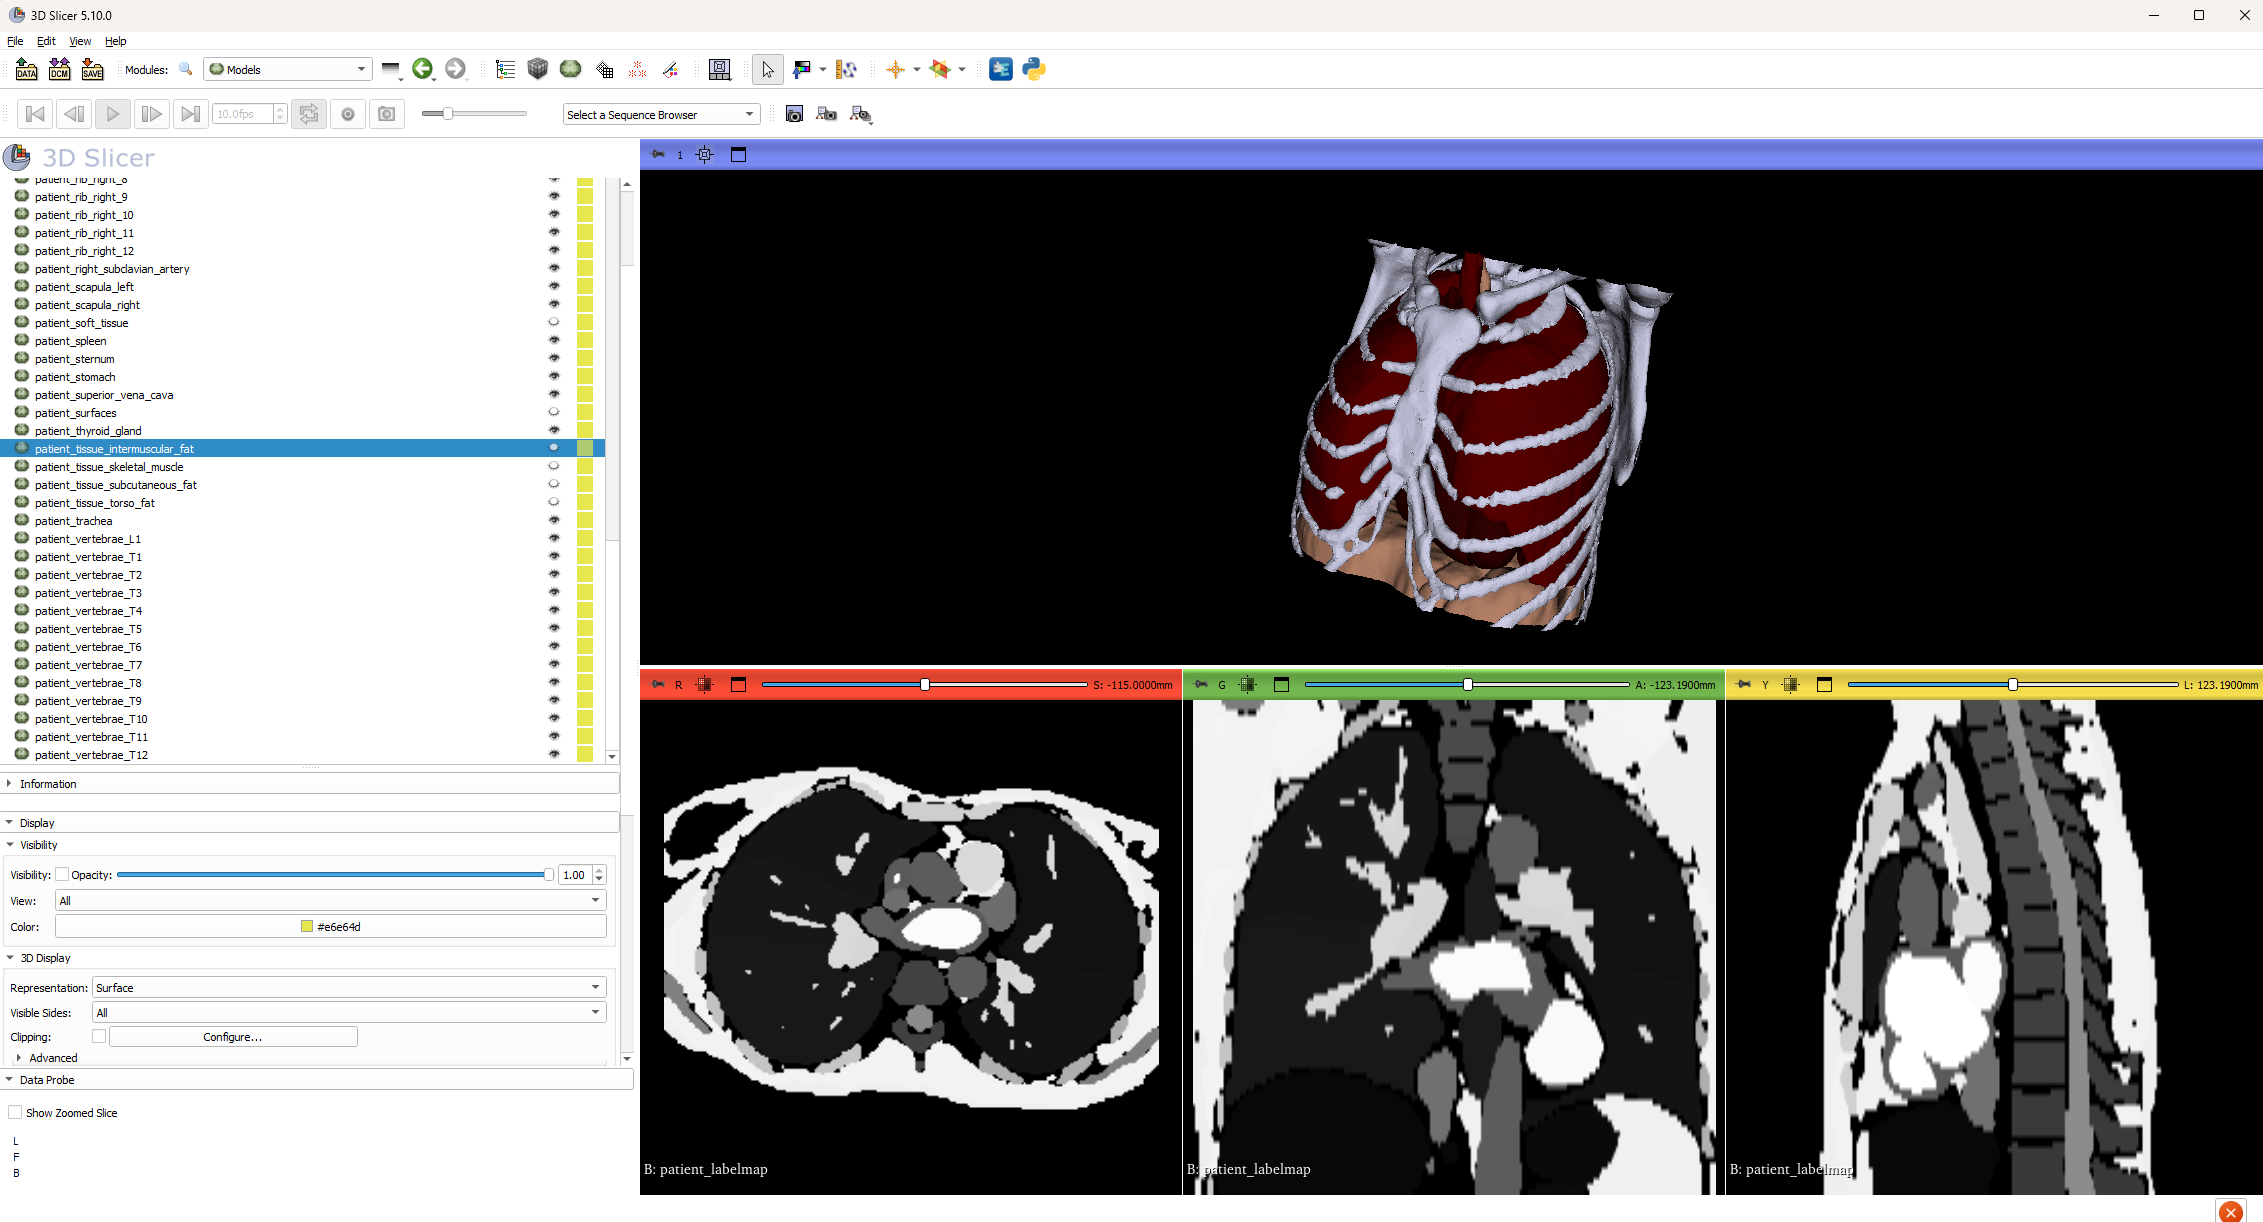
The same workflow on a TCIA-4DLung respiratory case.
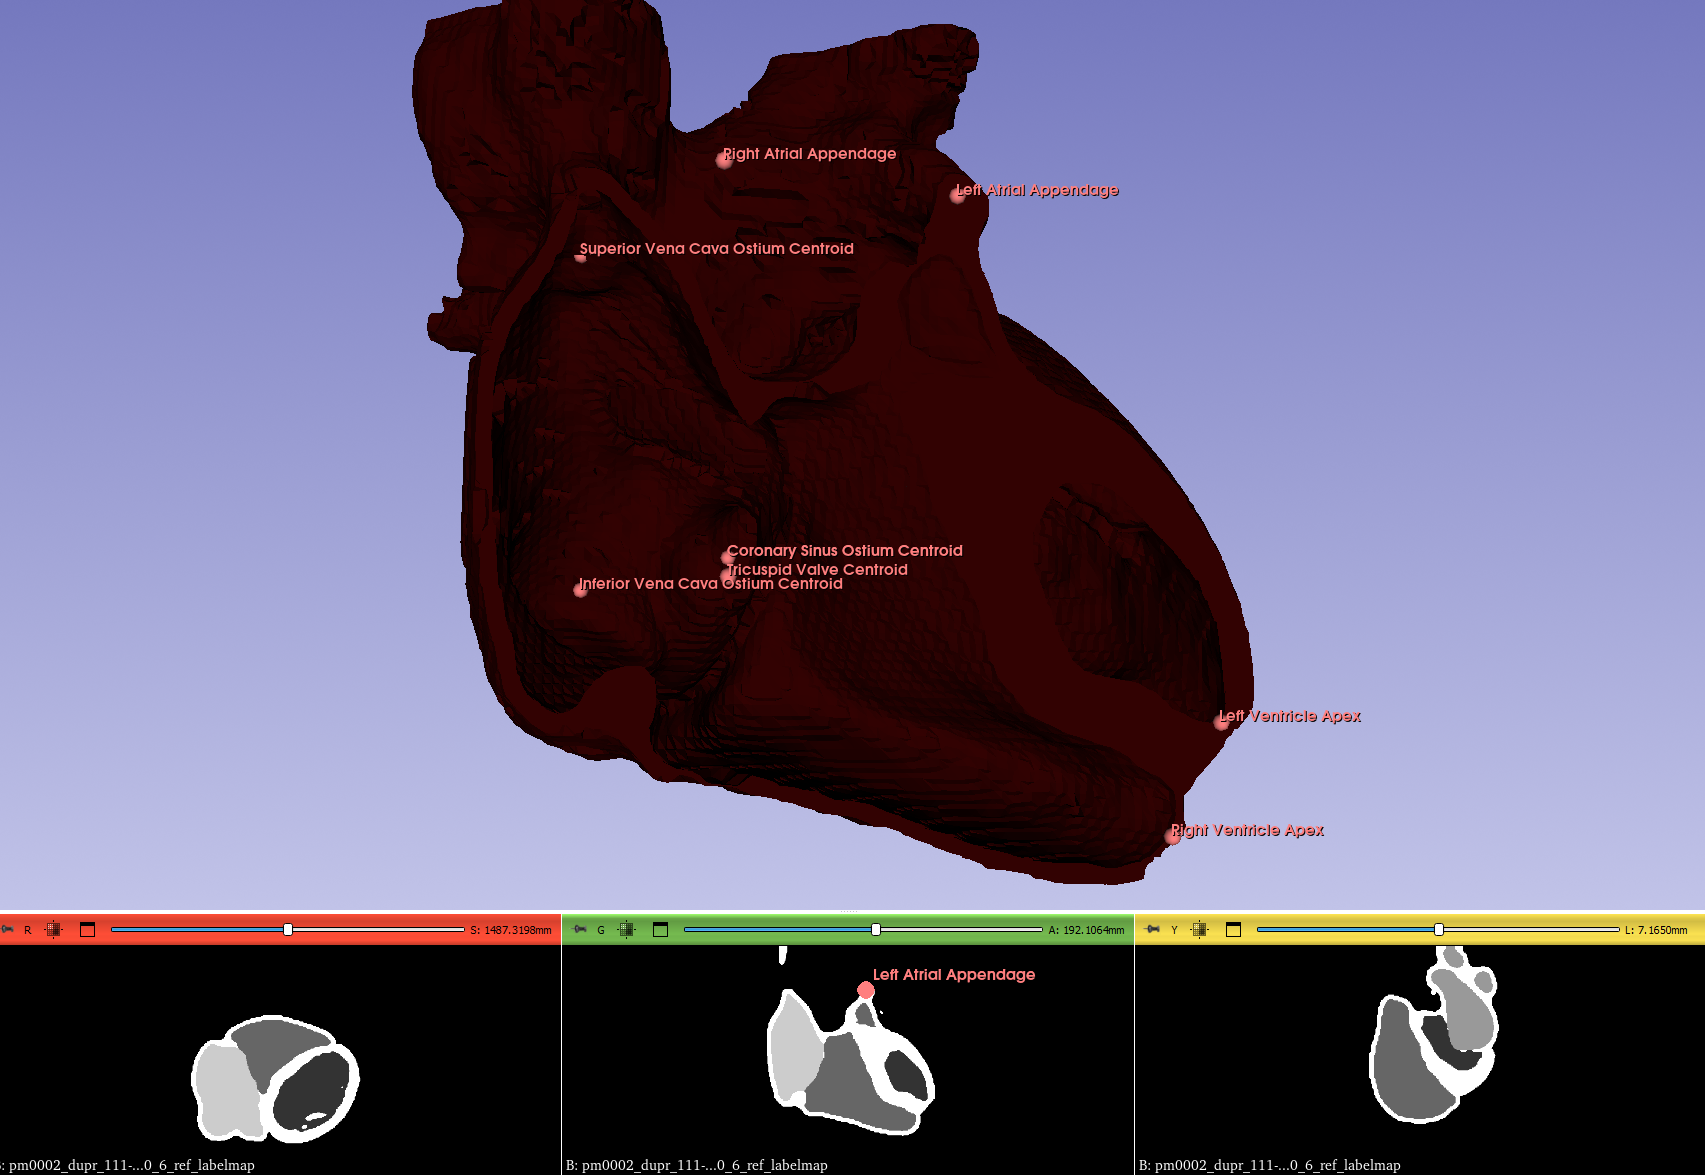
The
duke_heartvariant, which starts from a gated labelmap rather than a CT and also writes tetrahedral meshes.- Inner API usage
workflow = WorkflowConvertImageToVTK(
    segmentation_method=segmentation_method,
)
result = workflow.process(
    input_image=ct_image,
    surface_reduction_rate=HEART_CT_KCL.surface_reduction_rate,
    extract_label_surfaces=save_label_surfaces,
)
- Run
python tutorials/tutorial_04_heart_ct_to_vtk.py
python tutorials/tutorial_04_lung_ct_to_vtk.py
- Outputs
patient_surfaces.vtp(all anatomy in one mesh, with a per-cellSegmentationLabelIdsarray so each cell still names the structure it came from), per-group and per-label.vtpfiles,patient_labelmap.mhaand two screenshots, undertutorials/output/tutorial_04_{heart,lung}/.- Adapt to your data
Change the input volume path, then choose the segmenter matching your scan: contrast versus non-contrast CT, or
SegmentNVSegmentCTMRIfor CT and MRI. Raisesurface_reduction_ratein the tutorial’s parameter module toward1.0for lighter meshes. Every segmenter declares its own labels throughAnatomyTaxonomy, so downstream grouping and USD materials follow automatically - see Segmentation Modules.
Tutorial 5: VTK Surfaces to Animated USD
- Script
tutorials/tutorial_05_heart_vtk_to_usd.pytutorials/tutorial_05_duke_heart_vtk_to_usd.py- the 4D counterpart, animating Tutorial 4 (duke heart)’s per-phase surfaces. Needs Duke-Heart-4DLabelmaps (see Before You Start).- Workflow
- Dataset
Tutorial 4’s per-structure
patient_*.vtpsurfaces - no image data, no download.- Requirements
CPU only, seconds to run. The cheapest tutorial in the set.
- Preview
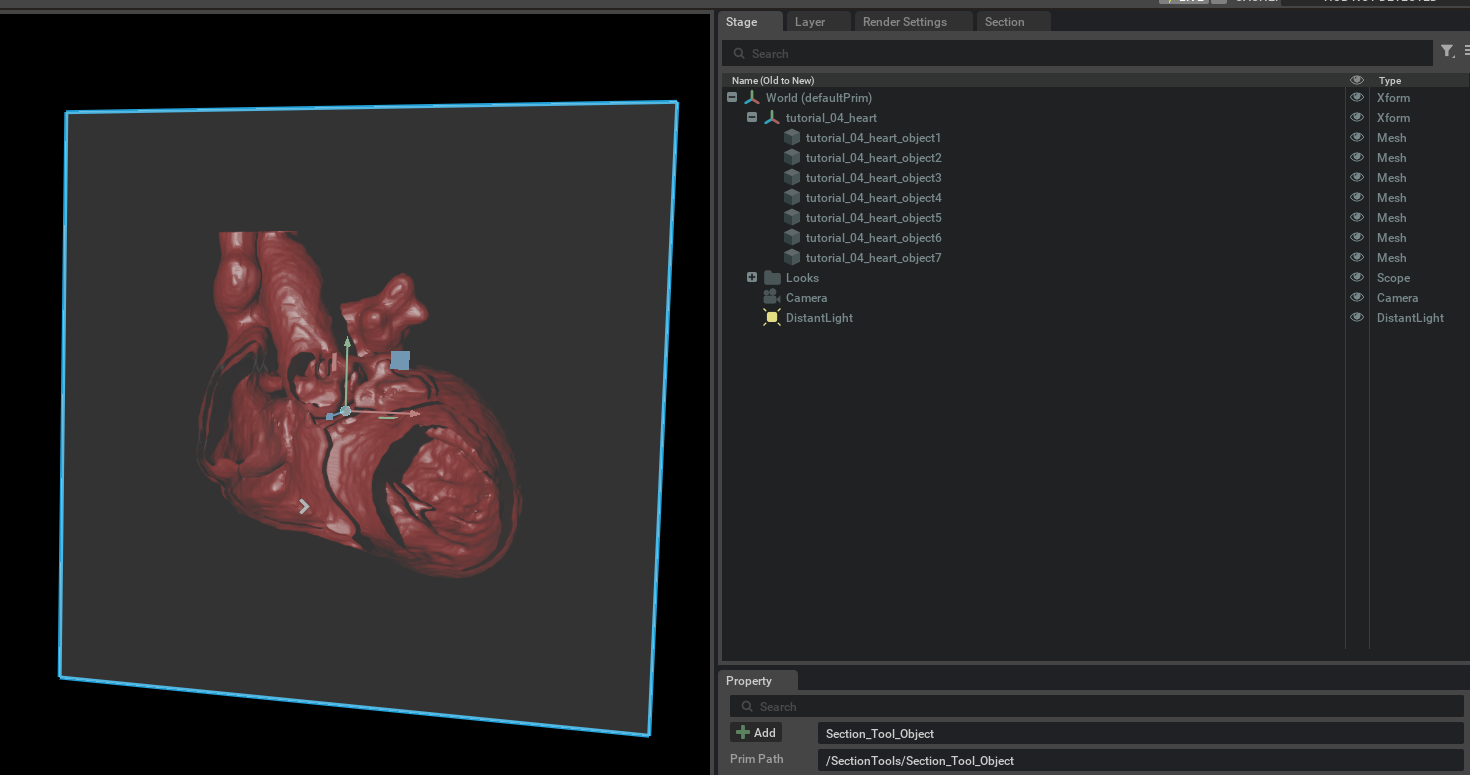
The exported USD scene, split by anatomy and painted with OmniSurface materials.
- Inner API usage
workflow = WorkflowConvertVTKToUSD(
    input_meshes=meshes,
    usd_project_name=project_name,
    output_directory=output_dir,
    appearance="anatomy",
    static_merge=True,
    separate_by_connectivity=True,
)
results = workflow.process()
Each input surface keeps the structure name that
WorkflowConvertImageToVTKwrote into itsfield_data['SegmentationLabelNames']. That name becomes the USD prim name and, withanatomy_typeleft unset, selects the prim’s material - so the left chambers, right chambers, myocardium and great vessels each get their own look rather than one shared heart material.- Run
python tutorials/tutorial_05_heart_vtk_to_usd.py- Outputs
The USD scene and a rendered screenshot under
tutorials/output/tutorial_05_heart/.- Adapt to your data
input_meshestakes any list of PyVista meshes - pass one per time point, in order, for an animated scene instead of a static one (dropstatic_merge), and setframes_per_secondto control playback.appearance="anatomy"binds per-organ materials throughProcessUSDAnatomy; setanatomy_typeto force one palette onto every object, orobject_namesto name the prims yourself. For file-in, file-out conversion without Python, see VTK to USD Conversion.
Tutorial 6: Create a PCA Shape Model
- Script
tutorials/tutorial_06_heart_create_statistical_model.pytutorials/tutorial_06_lung_create_statistical_model.pytutorials/tutorial_06_duke_heart_create_statistical_model.py- builds the cardiac model theduke_heartsurrogate chain trains against. Needs Duke-Heart-4DLabelmaps (see Before You Start).- Workflow
WorkflowCreateStatisticalModel; the lung variant first builds an unbiased atlas withWorkflowCreateMeanSurface.- Dataset
KCL-Heart-Model (auto-download) for the heart. The lung variant starts from raw TCIA-4DLung volumes, segmenting each case’s g070 phase itself.
- Requirements
The heart variant is CPU-only and quick. The lung variant is the slowest of Tutorials 1-7: one GPU segmentation per case, then a deformable registration per case per atlas iteration. Every intermediate is cached, so a re-run costs almost nothing.
- Preview
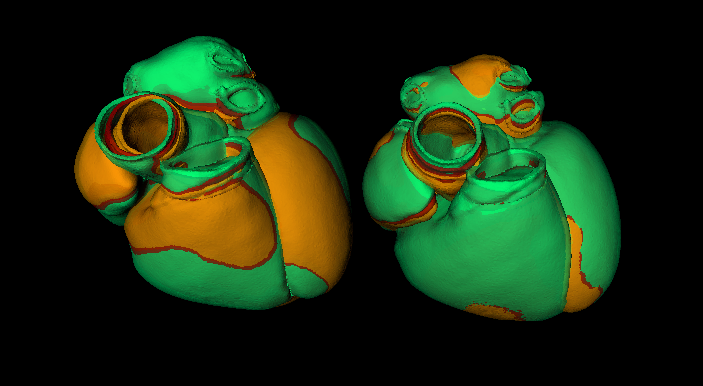
Heart model: the mean shape at ±2σ along its leading modes.
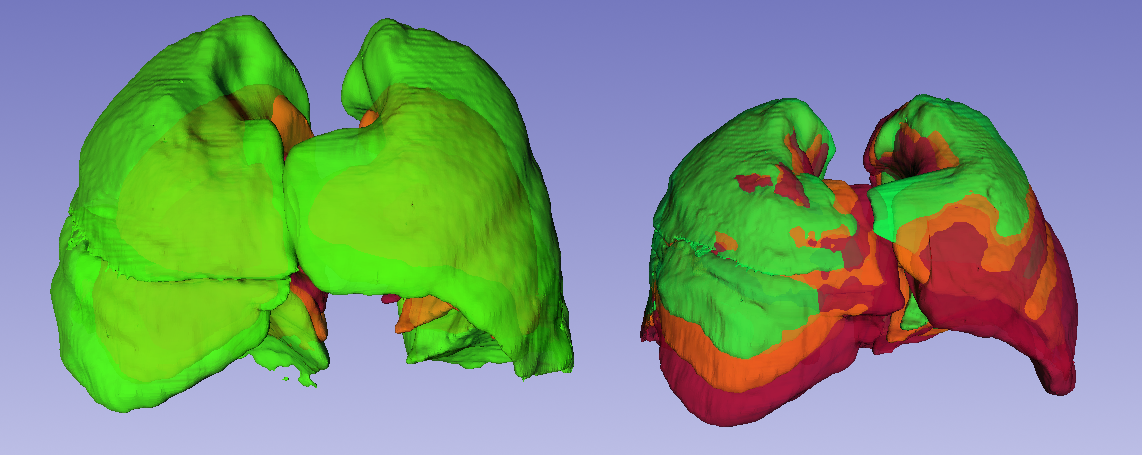
The same decomposition for the lung population.
- Inner API usage
mean_workflow = WorkflowCreateMeanSurface(surfaces=sample_surfaces)
mean_workflow.set_number_of_iterations(mean_surface_iterations)
reference_surface = mean_workflow.process()["mean_surface"]

workflow = WorkflowCreateStatisticalModel(
    sample_meshes=sample_surfaces,
    reference_mesh=reference_surface,
    number_of_pca_components=number_of_pca_components,
)
result = workflow.process()
- Run
python tutorials/tutorial_06_heart_create_statistical_model.py
python tutorials/tutorial_06_lung_create_statistical_model.py
- Outputs
pca_model.json,pca_mean_surface.vtp, the ±2σ mode surfaces and their renders, undertutorials/output/tutorial_06_{heart,lung}/. The lung variant also leaves its per-case segmentations there, which Tutorial 8 reuses.- Adapt to your data
The workflow wants a population of meshes plus one reference; point
sample_meshesat your own cohort and letWorkflowCreateMeanSurfacebuild the reference when no natural template exists.number_of_pca_componentstrades fidelity against cohort size - you need more subjects than modes. The savedpca_model.jsonis the portable artifact: Tutorials 7 and 8 and Create Statistical Model all speak it.
Tutorial 7: Fit the Shape Model to a Patient
- Script
tutorials/tutorial_07_heart_fit_statistical_model_to_patient.pytutorials/tutorial_07_lung_fit_statistical_model_to_patient.pytutorials/tutorial_07_duke_heart_fit_statistical_model_to_patient.py- fits the Tutorial 6 (duke heart) model. Needs Duke-Heart-4DLabelmaps (see Before You Start).- Workflow
- Dataset
Tutorial 6’s model plus one patient scan. The lung variant fits to
Chest-CT- an ungated, single-acquisition chest CT, the kind a patient-specific model is normally fitted to. Seedata/Chest-CT/README.mdfor the data source and required citation.- Requirements
One segmentation pass plus a PCA-constrained fit; GPU recommended for the segmentation, and no registration over time.
- Preview
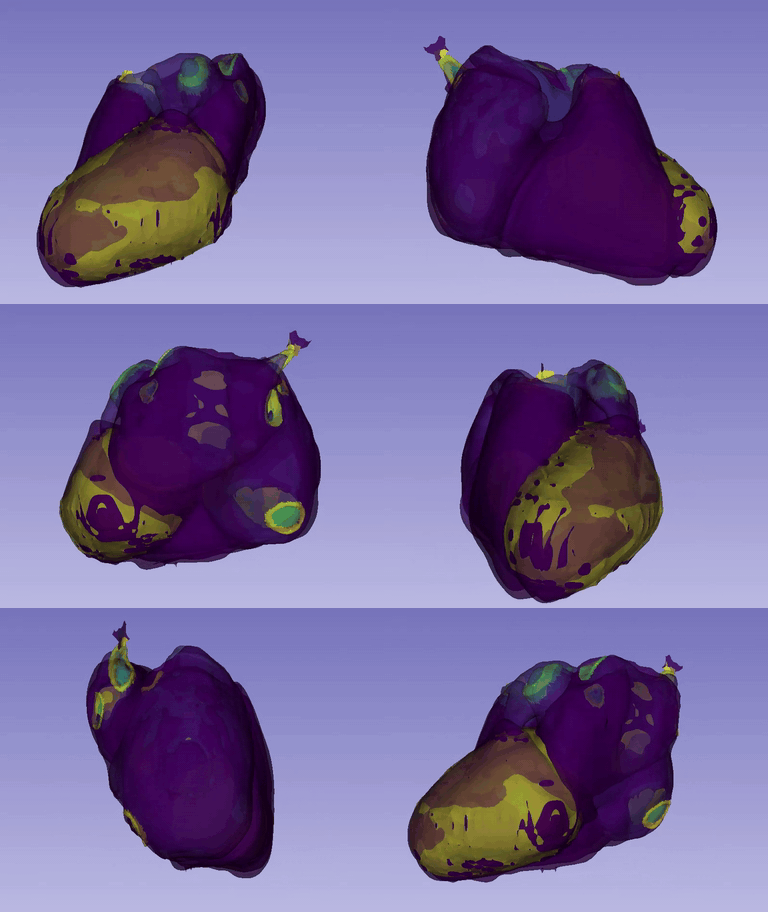
The heart model fitted to a non-contrast scan.
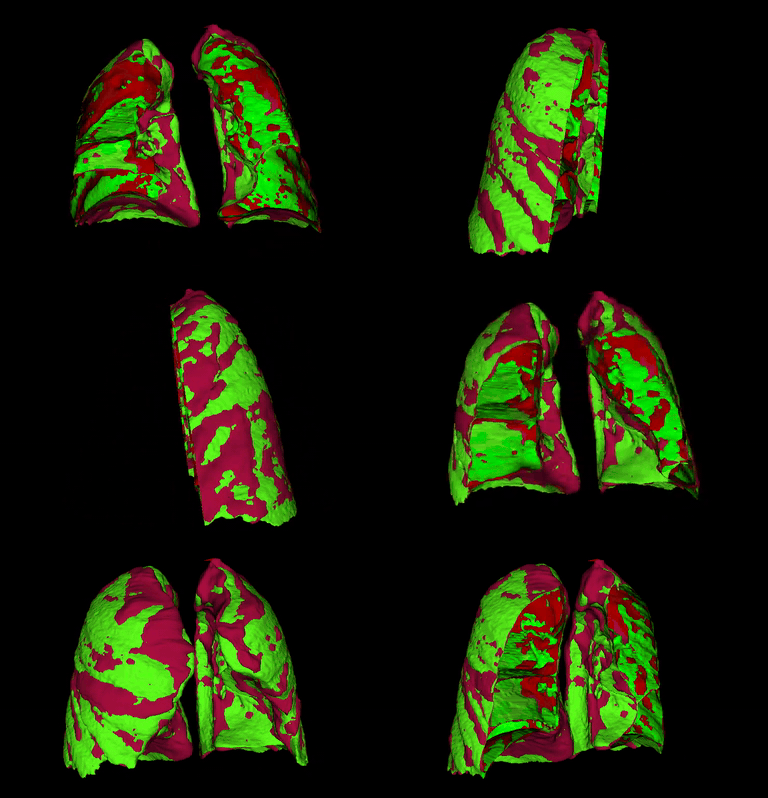
The lung model fitted to the ungated
Chest-CTvolume.- Inner API usage
workflow = WorkflowFitStatisticalModelToPatient(
    template_model=pca_mean,
    patient_models=[patient_surface],
    patient_image=patient_image,
    patient_labelmap=patient_labelmap,
)
workflow.set_use_pca_registration(
    use_pca_registration=True,
    pca_model=pca_model,
)
result = workflow.process()
- Run
python tutorials/tutorial_07_heart_fit_statistical_model_to_patient.py
python tutorials/tutorial_07_lung_fit_statistical_model_to_patient.py
- Outputs
The registered template surface, the fitted mesh, and - the piece the rest of the pipeline needs -
*_registered_coefficients.json, the patient’s position in shape space. Undertutorials/output/tutorial_07_{heart,lung}/.- Adapt to your data
Set the patient image path and keep the segmenter consistent with the one that built the model.
labelmap_interior_object_ids(heart) tells the fit which labels are interior structures - those ids are TotalSegmentator’s chamber labels, so change them if you change segmenter. Turnset_use_pca_registrationoff to fall back to an unconstrained template-to-patient fit when you have no model. The CLI equivalent is Heart Model to Patient Registration.
Tutorial 8: Propagate the Shape Model Through 4D
- Script
tutorials/tutorial_08_lung_fit_model_to_4d_patients.pytutorials/tutorial_08_duke_heart_fit_model_to_4d_patients.py- the same fit-then-propagate pass over cardiac phases, usingRegisterModelsDistanceMapsin place of the image registration. Needs Duke-Heart-4DLabelmaps (see Before You Start).- Workflow
WorkflowFitStatisticalModelToPatientat the reference phase, thenWorkflowReconstructHighres4DCTto carry the fitted surface through every other phase.- Dataset
TCIA-4DLung, plus Tutorial 6 (lung)’s model. Tutorial 2’s finetuned distance-map ICON weights are used by the model fit when present; without them the tutorial warns and fits with the stock uniGradICON weights.
- Requirements
GPU required, and the heaviest registration workload in the set: one segmentation and one fit per case, plus one registration per phase per case.
- Preview
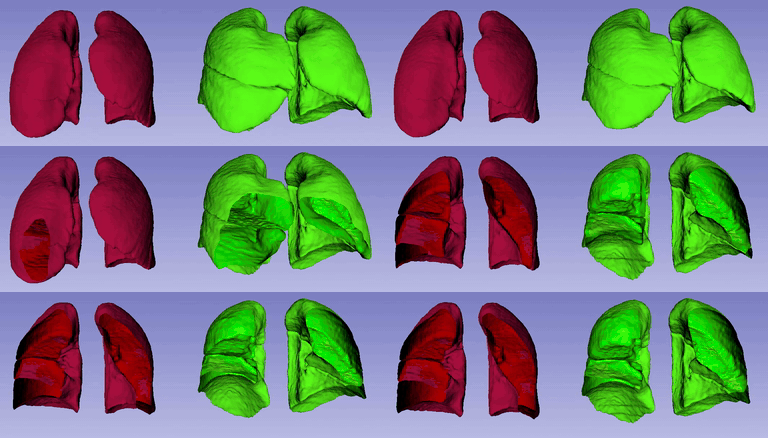
The fitted shape-model surface propagated across the phases of a TCIA-4DLung case.
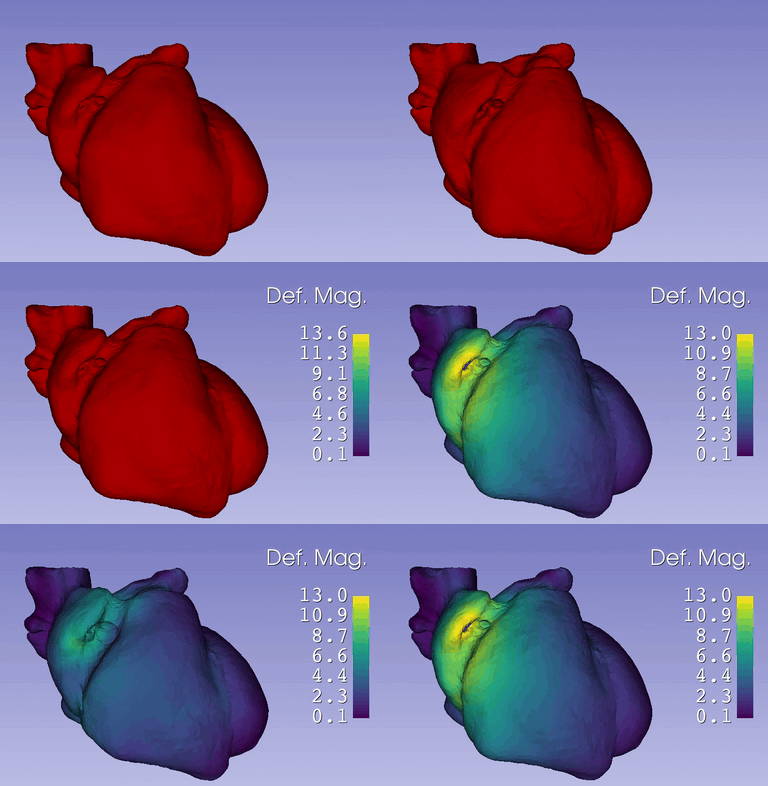
The
duke_heartvariant, coloured by deformation magnitude across the cardiac phases.- Inner API usage
fit_workflow = WorkflowFitStatisticalModelToPatient(
    template_model=pca_mean_surface,
    patient_models=[lung_surface],
    patient_image=reference_image,
    patient_labelmap=lung_labelmap,
)
fit_workflow.set_use_pca_registration(True, pca_model=pca_model)

reg_workflow = WorkflowReconstructHighres4DCT(
    time_series_images=time_series,
    reference_image=reference_image,
    reference_time_frame=phase_ids.index(reference_phase),
    register_reference_time_frame_to_reference_image=False,
    registration_method=registration_method,
)
- Run
python tutorials/tutorial_08_lung_fit_model_to_4d_patients.py- Outputs
Per case, under
tutorials/output/tutorial_08_lung/<case>/: the fitted reference surface, its PCA coefficients, and one warped surface plus fixed_to_moving/moving_to_fixed transform per phase. Those per-phase surfaces are exactly the training set Tutorial 9 consumes.- Adapt to your data
Point
data_dirat a directory of per-case 4D series and setreference_phaseto the phase your model was built at; the case and phase file patterns are two globs near the top of the script. Everything is cached per case, so adding a subject re-runs only that subject.
Tutorial 9: Train a PhysicsNeMo Surrogate
- Script
tutorials/tutorial_09_lung_train_physicsnemo_mgn.pytutorials/tutorial_09_duke_heart_train_physicsnemo_mgn.py- trains the cardiac network Tutorial 13 uses for its heartbeat. Needs Duke-Heart-4DLabelmaps (see Before You Start).- Workflow
WorkflowTrainPhysicsNeModrivingTrainPhysicsNeMoMGN, thenWorkflowInferPhysicsNeMoandWorkflowInferMovementto score the held-out case. A fully connectedTrainPhysicsNeMoMLPmethod is a drop-in replacement; no separate tutorial ships for it.- Dataset
Tutorial 8’s per-phase surfaces and Tutorial 6 (lung)’s mean surface. The tutorial writes one JSON manifest per case, plus the per-vertex displacement targets those manifests point at.
- Requirements
GPU, Python >= 3.11. 1500 epochs by default.
- Preview
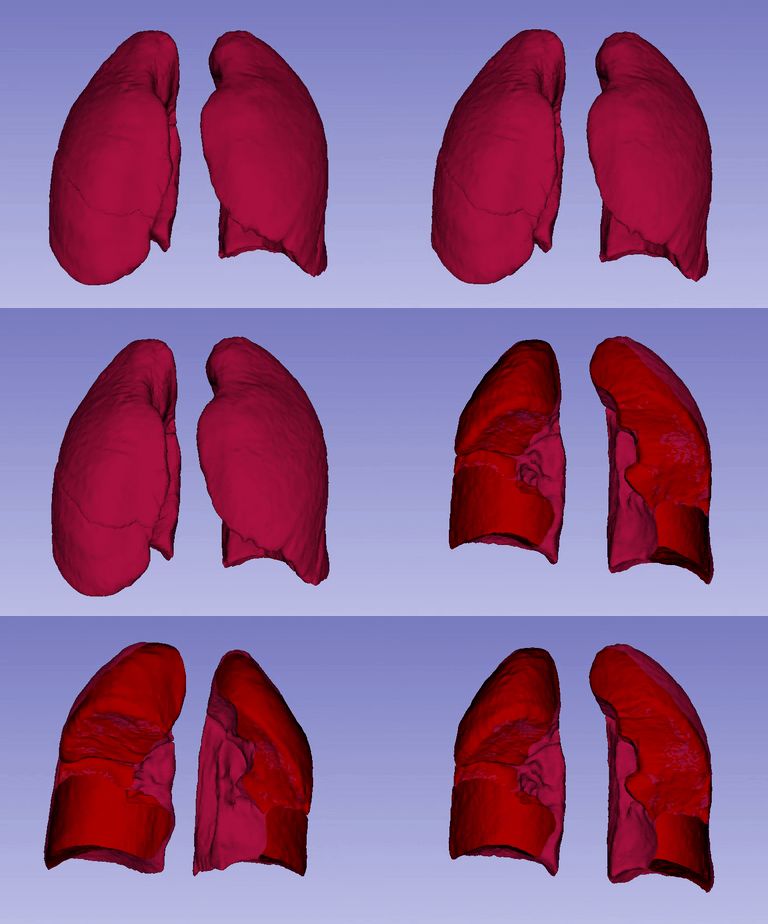
The held-out lung case, predicted at every stage by the trained network.
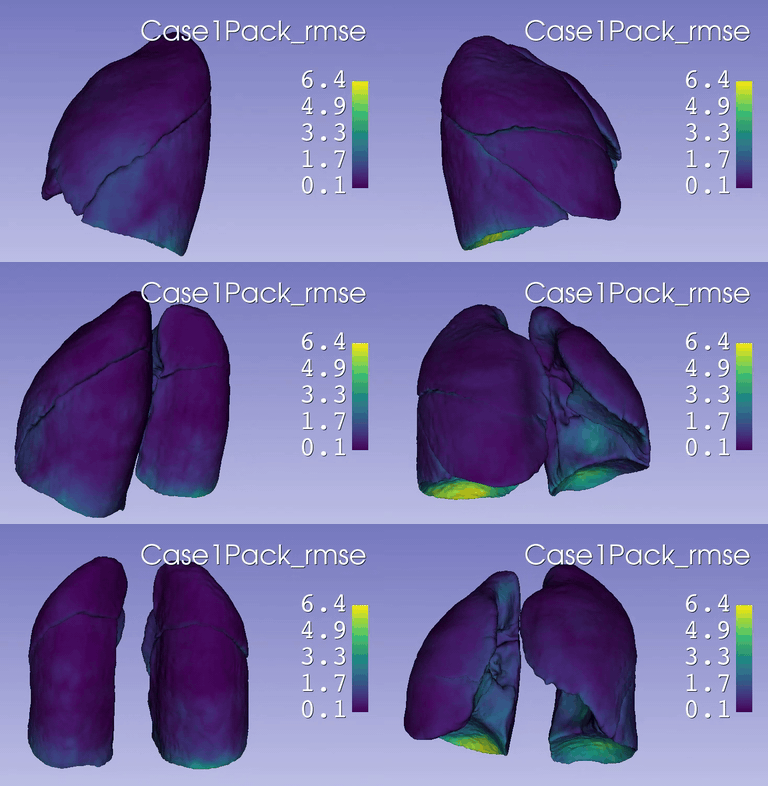
The same surface coloured by per-vertex error against the registration that produced the training data.
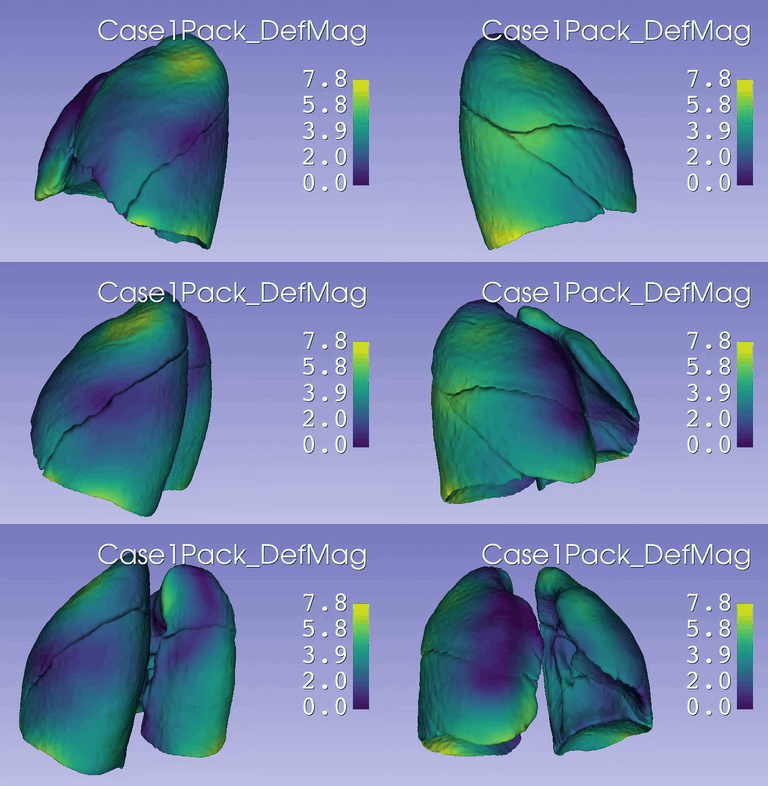
Deformation magnitude, which is what the error above should be read against - the largest errors sit where the motion is largest.
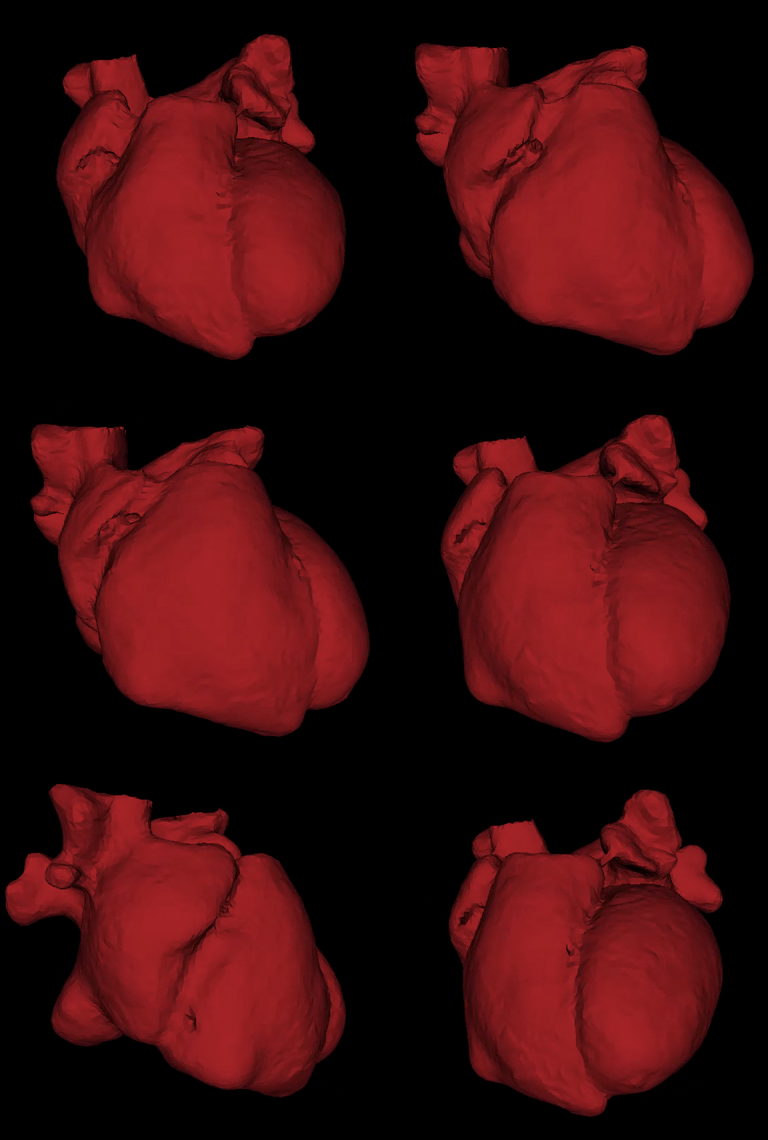
The
duke_heartvariant over a cardiac cycle, with its own RMSE and deformation-magnitude captures intutorial_09_duke_heart_rmse.gifandtutorial_09_duke_heart_deformation_magnitude.gif.- Inner API usage
training_method = TrainPhysicsNeMoMGN()
training_method.set_epochs(epochs)
training_method.set_processor_size(processor_size)

train_workflow = WorkflowTrainPhysicsNeMo(
    train_manifests=train_manifests,
    val_manifests=val_manifests,
    pca_mean_mesh=ssm_mean_surface_file,
    output_directory=output_dir,
    training_method=training_method,
)
train_result = train_workflow.process()
- Run
python tutorials/tutorial_09_lung_train_physicsnemo_mgn.py- Outputs
mgn_stage_model.pt, its metadata and loss/RMSE logs, in the shared weights directory Tutorial 10 reads (tutorials/network_weights/physicsnemo_mgn_lung_motion/, a fresh sibling of it when resuming). The per-case manifests and the held-out evaluation undereval_mgn/stay intutorials/output/tutorial_09_lung_mgn/. A pretrained checkpoint is also available viamonai-physio-download-data PhysicsNeMo-MGN-Lung-Motion, which extracts to that same weights directory - a shortcut to skip this tutorial and start at Tutorial 10.- Adapt to your data
The contract is the manifest, not the tutorial. Each JSON names a reference mesh, a PCA coefficient file, a
target_arrayname and one entry per phase; the workflow reads that array verbatim, so the target can be displacement - as here - or any per-point quantity of any width. Produce manifests in that shape from your own pipeline and nothing else changes. See PhysicsNeMo AI Surrogates for the schema, and Train a PhysicsNeMo Surrogate for the command-line path.
Tutorial 10: Predict Motion With the Surrogate
- Script
tutorials/tutorial_10_lung_infer_physicsnemo_mgn.pytutorials/tutorial_10_duke_heart_infer_physicsnemo_mgn.py- the same prediction over a cardiac cycle. Needs Duke-Heart-4DLabelmaps (see Before You Start).- Workflow
WorkflowInferPhysicsNeMofor the raw prediction,WorkflowInferMovementto turn it back into geometry, andWorkflowConvertVTKToUSDto export it.- Dataset
Tutorial 8’s fitted surfaces for one case, and Tutorial 9’s checkpoint - or, to skip Tutorial 9 entirely, the same checkpoint fetched with
monai-physio-download-data PhysicsNeMo-MGN-Lung-Motion.- Requirements
Trivial - one forward pass per stage replaces the per-phase registration solve that produced the training data.
- Preview
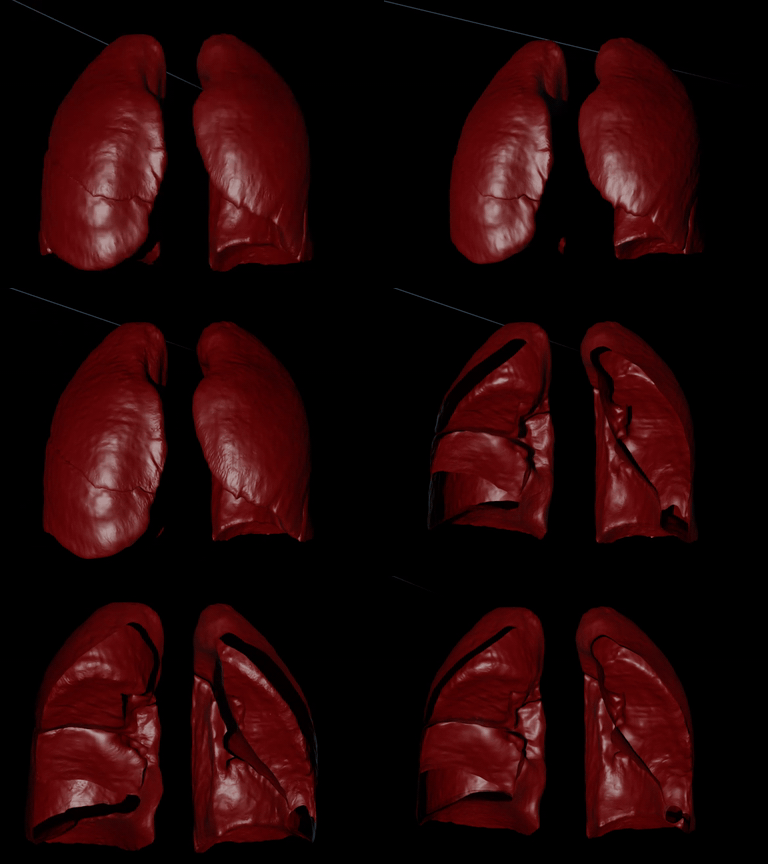
The exported USD scene, played back over the respiratory cycle - every frame a forward pass rather than a registration solve.
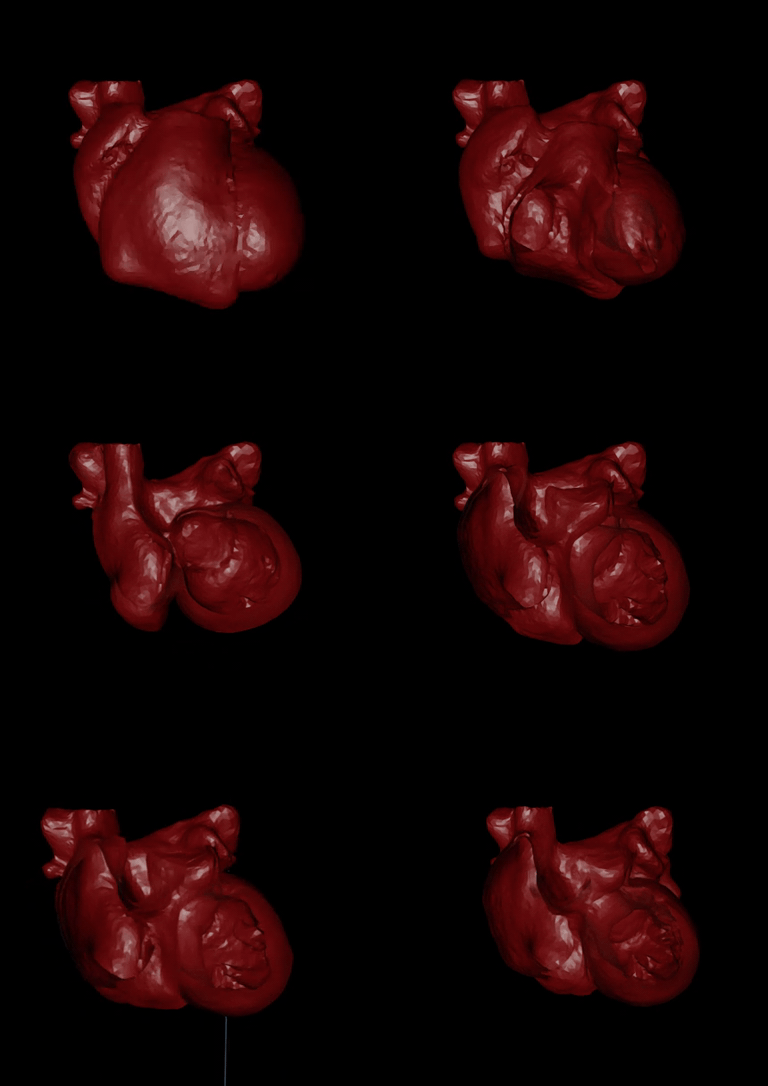
The
duke_heartvariant over a cardiac cycle.- Inner API usage
infer_workflow = WorkflowInferPhysicsNeMo(
    model_directory=model_dir,
    epoch=epoch,
)
infer_result = WorkflowInferMovement(infer_workflow).process_time_series(
    shape_parameters=pca_file,
    stages=stages,
    output_directory=output_dir,
    fitted_reference_mesh=fitted_reference_mesh_file,
    ground_truth=phase_files,
    reference_image=itk.imread(str(reference_ct_file)),
    warp_interpolation="linear",
    warp_background_value=-1000.0,
    usd_project_name=f"{case_id}_mgn_motion",
    anatomy_type="lung",
)
- Run
python tutorials/tutorial_10_lung_infer_physicsnemo_mgn.py- Outputs
One predicted surface and one warped CT per stage, and one animated USD across all of them, under
tutorials/output/tutorial_10_lung_mgn/<case>/. The acquired phase surface is rendered beside the prediction for visual comparison; scoring it is Tutorial 11’s job.- Adapt to your data
Change
case_idto predict a different subject, or passstagesthat were never acquired - which is the point of the surrogate. Omitreference_imageto write meshes without warping anything. UseWorkflowInferPhysicsNeMoon its own to get the raw target array when your model predicts something other than displacement.
Tutorial 11: Score the Surrogate Against the Images
- Script
tutorials/tutorial_11_lung_evaluate_physicsnemo.pytutorials/tutorial_11_duke_heart_evaluate_physicsnemo.py- Workflow
WorkflowEvaluateMovement, drivingWorkflowInferMovementand, for the lung variant,SegmentChestTotalSegmentator.- Dataset
The gated sequence itself - TCIA-4DLung for the lung, Duke-Heart-4DLabelmaps for the heart - plus Tutorial 8’s fitted surface and Tutorial 9’s checkpoint for the held-out case.
- Requirements
The lung variant also segments every gated frame on first run, so it needs a GPU and the segmentation weights; the labelmaps are cached, and a re-run skips them.
- Preview
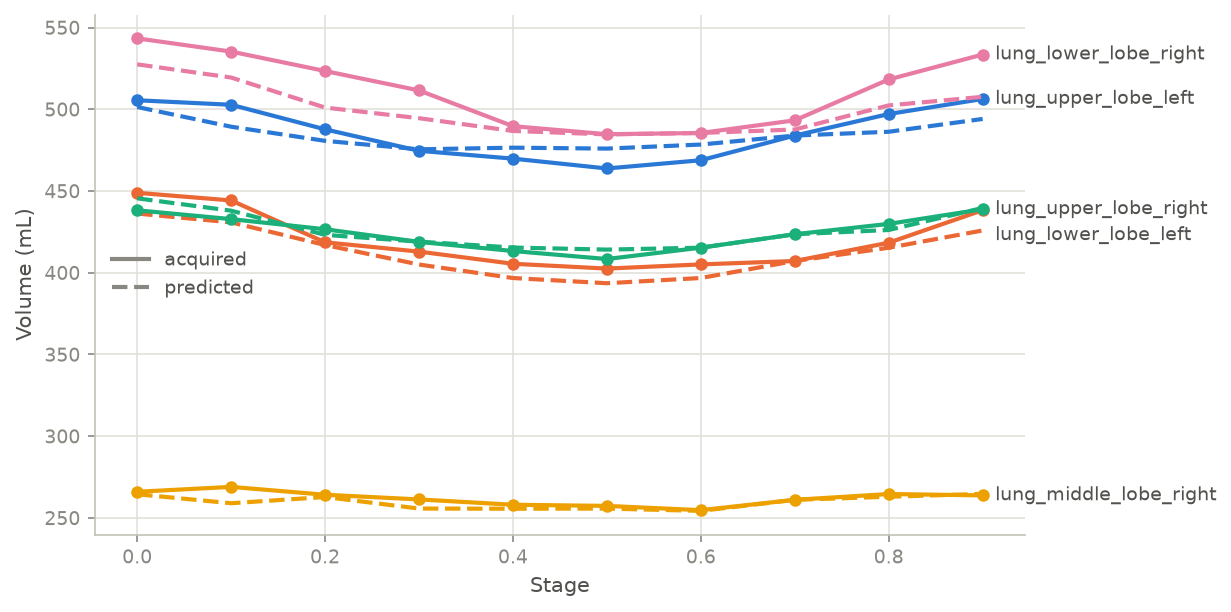
volume_vs_stage.pngfor the held-out lung case: acquired volume solid, predicted dashed, one pair per lobe across every gated stage.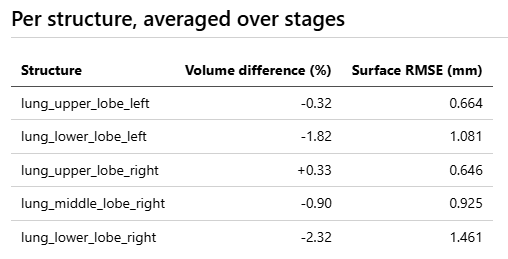
The same run summarised per lobe. No Dice column - see the note below.
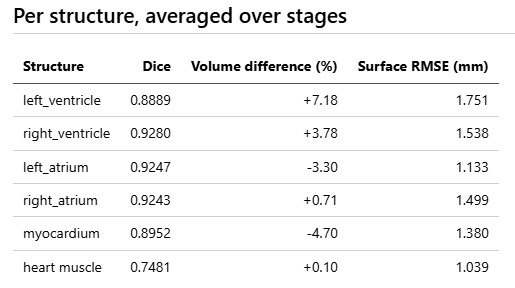
The
duke_heartvariant, which does report Dice per chamber, alongside its owntutorial_11_duke_heart_volumes.png.- Inner API usage
evaluate = WorkflowEvaluateMovement(
    movement_workflow=WorkflowInferMovement(infer_workflow),
    label_names=lobe_names,
)
result = evaluate.process(
    case_id=case_id,
    shape_parameters=pca_file,
    fitted_reference_mesh=fitted_reference_mesh_file,
    reference_labelmap=itk.imread(str(reference_labelmap_file)),
    ground_truth_labelmaps=ground_truth_labelmaps,
    output_directory=output_dir,
    evaluation_spacing_mm=2.0,
    report_dice=False,
)
- Run
python tutorials/tutorial_11_lung_evaluate_physicsnemo.py- Outputs
evaluation_report.md,evaluation_metrics.csvandvolume_vs_stage.pngundertutorials/output/tutorial_11_lung/<case>/, carrying volume difference and surface RMSE per lobe at every gated stage; the duke variant adds Dice per chamber. The plot traces each structure’s acquired and predicted volume across the stages. Report and CSV both record the hold-out case name, its shape parameters, and the network weights path with its dates, so a number can be traced back to the run that produced it.The lung variant passes
report_dice=False. Dice is an overlap fraction, so a lobe that moves a few millimeters against its own bulk scores over 0.96 however well or badly the motion is predicted; the column would describe the lobe rather than the model. Chambers change shape enough over a heartbeat for it to discriminate, so the duke variant keeps it.- Adapt to your data
Change
LOBE_LABEL_IDS(orHEART_LABEL_IDS) to score a different set of structures - any label your segmenter writes and your reference frame contains. Raiseevaluation_spacing_mmif the deformation fields do not fit in memory; lower it to resolve a thin wall, at the cost of its cube.
Tutorial 12: The Whole Inference Pipeline in One Script
- Script
tutorials/tutorial_12_lung_end_to_end_inference.pytutorials/tutorial_12_duke_heart_end_to_end_inference.py- Workflow
WorkflowConvertImageToVTK(lung) orProcessContours(heart),WorkflowFitStatisticalModelToPatient, thenprocess_time_series().- Dataset
The gated sequence alone - TCIA-4DLung for the lung, Duke-Heart-4DLabelmaps for the heart - plus the Tutorial 6 shape model and the Tutorial 9 checkpoint. Unlike Tutorial 10, nothing is read from Tutorial 8: this script fits the model to the patient itself, so the chain from image to animation runs in one place.
- Requirements
The output directory is emptied at the start of every run, so nothing is reused and the reported runtimes are the whole pipeline’s. Neither variant registers a phase - that is what the network replaces, and it is why this runs in minutes where Tutorial 8 runs in hours.
- Preview
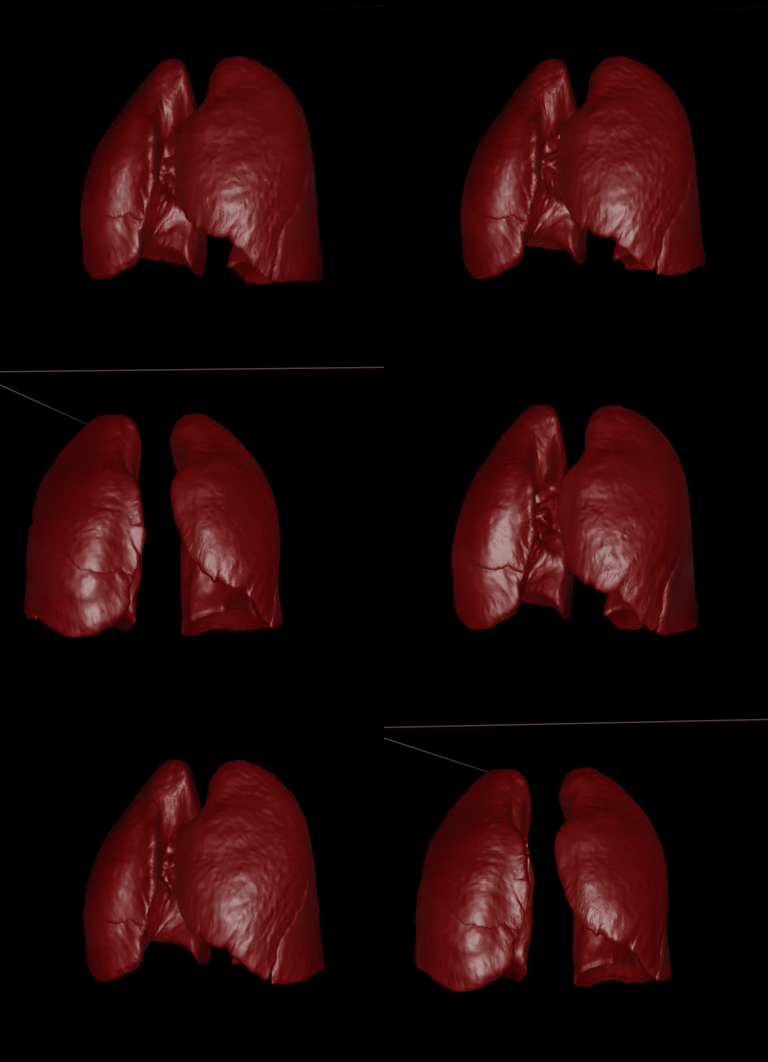
The whole chain on one TCIA-4DLung case: segment, fit, infer, animate - no phase registered anywhere in it.
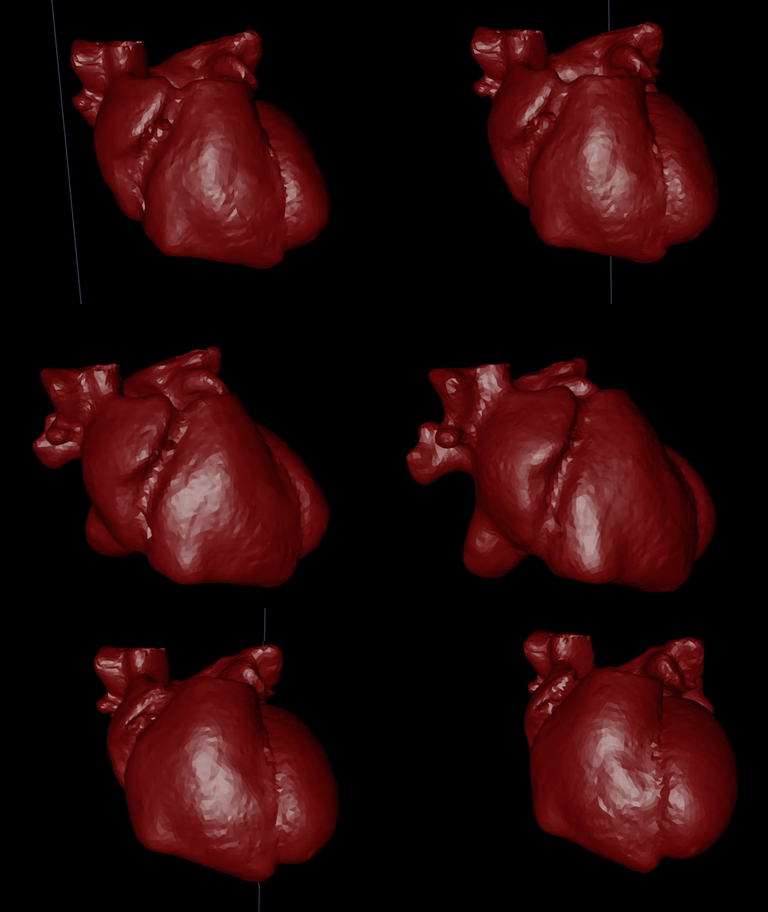
The
duke_heartvariant, starting from gated labelmaps instead of CT.- Inner API usage
# The fit puts the model in this patient: coefficients condition the
# network, and the fitted surface is what its displacements move.
fit = WorkflowFitStatisticalModelToPatient(
    template_model=pca_mean_surface,
    patient_models=[lung_surface],
    patient_image=reference_image,
    patient_labelmap=lung_labelmap,
)
fit.set_use_pca_registration(
    use_pca_registration=True,
    pca_model=pca_model,
    number_of_pca_components=6,
    use_surface=False,
)
fit_result = fit.process()

infer_result = WorkflowInferMovement(infer_workflow).process_time_series(
    shape_parameters=pca_coefficients_file,
    stages=stages,
    output_directory=output_dir,
    fitted_reference_mesh=fitted_reference_mesh_file,
    reference_image=reference_image,
    usd_project_name=f"{case_id}_mgn_motion",
    anatomy_type="lung",
)
- Run
python tutorials/tutorial_12_lung_end_to_end_inference.py- Outputs
Under
tutorials/output/tutorial_12_lung/<case>/(ortutorial_12_duke_heart): the patient’s fitted<case>_ssm_surface.vtpand<case>_ssm_pca_coefficients.json, one predicted*_pred.vtpsurface and one*_warped.mhavolume per stage,<case>_mgn_motion.usdanimating the whole cycle, and<case>_runtimes.csvtiming each step of the run.- Adapt to your data
Point the script at any case of the same cohort by changing
case_id; the stages come from the filenames, so a sequence with a different number of phases needs no other change. To predict stages the acquisition never sampled, pass your ownstageslist - the network is continuous in stage, and nothing downstream requires a matching image.
Tutorial 13: Breathe and Beat a Static Clinical CT
- Script
tutorials/tutorial_13_heart_and_lung_motion.py- Workflow
WorkflowInferMovementover both Tutorial 9 networks,WorkflowFitStatisticalModelToPatientfor the heart fit, andConvertVTKToUSDwithProcessUSDAnatomyfor the animation.- Dataset
data/Chest-CT/Chest-CT.mha, one ungated breath-hold scan, plus Tutorial 7 (lung)’s fit of it and both Tutorial 9 checkpoints. No 4D acquisition is involved: every deformation comes from a network, none from a registration. Seedata/Chest-CT/README.mdfor the data source and required citation.- Requirements
Simpleware Medical for the heart segmentation. Both segmentations and the heart fit are cached, so a re-run goes straight to inference. Budget disk: 100 combined frames, each with its own warped CT and labelmap, come to roughly 43 GB.
- Preview
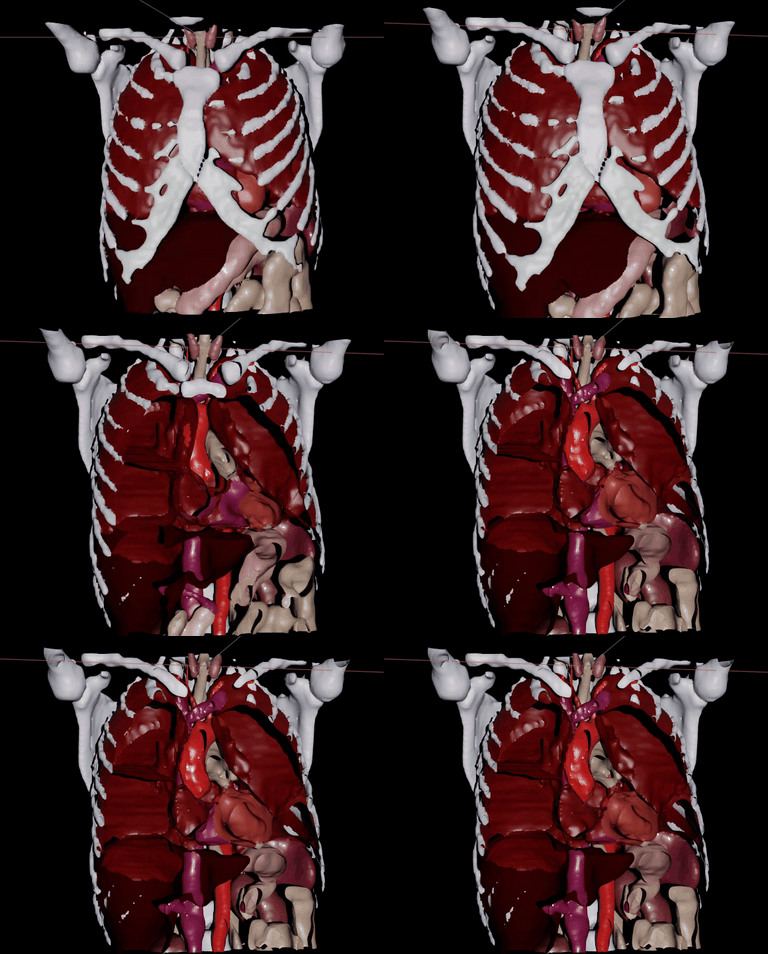
heart_and_lung_motion.usd: one ungated breath-hold scan, breathing and beating at once, with every deformation coming from a network and none from a registration.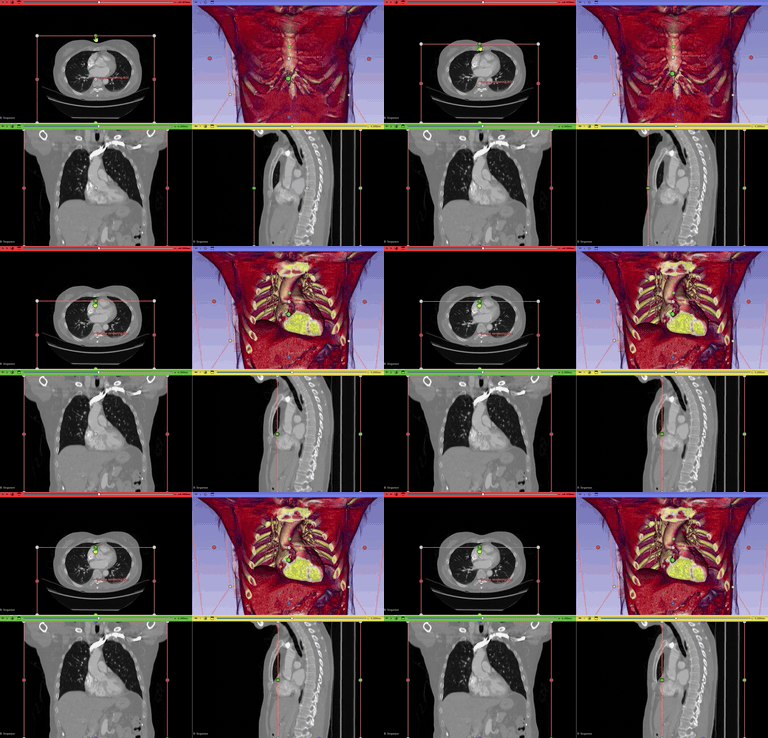
The same per-frame deformation applied to the CT itself - the voxels move with the surfaces, so the scan breathes and beats along with them.
- Inner API usage
infer = WorkflowInferMovement(
    WorkflowInferPhysicsNeMo(model_directory=lung_model_dir)
)
# "forward" moves mesh vertices; "inverse" is what resampling an image
# into the stage's frame needs.
field = infer.create_deformation_field(
    shape_parameters=lung_coefficients_file,
    stage=0.0,
    reference_image=patient_image,
    fitted_reference_mesh=lung_fitted_reference_mesh_file,
    direction="forward",
)
transform = ProcessTransforms().smooth_deformation_field_transform(
    field["deformation_field"], 15.0, field["weight_image"]
)
- Run
python tutorials/tutorial_13_heart_and_lung_motion.py- Outputs
Under
tutorials/output/tutorial_13_heart_and_lung/: one 4D USD per rhythm (breathing_lungs.usd,beating_heart.usd), 100 combined frames as VTP plusheart_and_lung_motion.usdsplit by anatomy and painted with organ materials, and the CT and labelmap warped by the same per-frame deformation.- Adapt to your data
Point
patient_image_fileat your own chest CT and rerun Tutorial 7 (lung) on it to get the lung fit; the heart fit happens inside this script. Changecardiac_cycles_per_phaseto re-time the heartbeat against the breath, and the two*_sigma_mmvalues to change how far each rhythm’s surface motion is carried into the surrounding tissue.
Tutorial 14: Sweep the Shape Parameters
- Script
tutorials/tutorial_14_lung_shape_parameter_sweep.py(TCIA-4DLung)tutorials/tutorial_14_duke_heart_shape_parameter_sweep.py(Duke-Heart-4DLabelmaps)- Workflow
WorkflowInferPhysicsNeModrivingInferPhysicsNeMoMGN, scored byWorkflowEvaluateMovementonce per grid point.- Dataset
The held-out case of Tutorial 9, plus its Tutorial 8 fit and the Tutorial 9 checkpoint.
- Requirements
A GPU, and the segmentation weights — every grid point is scored against independently segmented frames, exactly as Tutorial 11 scores its one fit.
- Preview
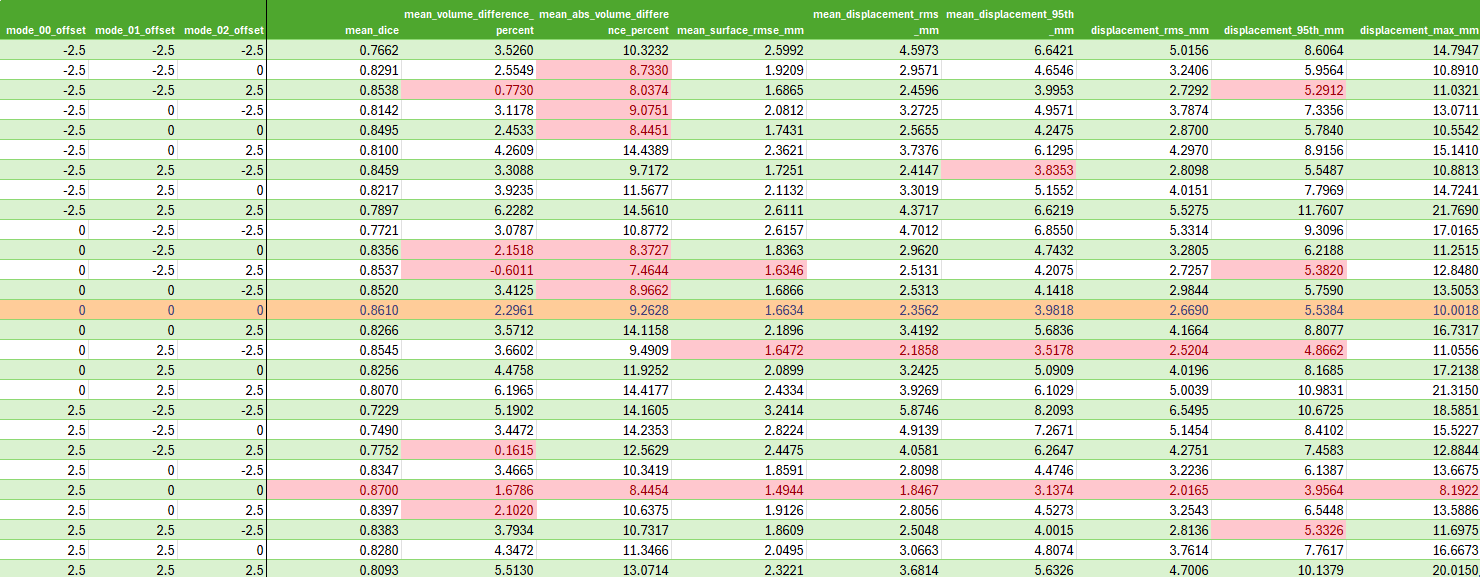
The Duke Heart variant’s sweep summary: pooled displacement error at every grid point, with the all-zero combination as the unperturbed baseline. No lung-variant figure exists yet.
- What it does
Tutorial 11 scores the inferred motion at the one point in shape space the statistical-model fit happened to land on. This tutorial sweeps that point: it perturbs the first few PCA coefficients over a grid, re-infers the whole cycle at every combination, and scores each the way Tutorial 11 scores its single fit.
Only the coefficients handed to the network change. The reference anatomy stays the Tutorial 8 fitted surface at every grid point, so what the perturbation moves is the displacement field the MeshGraphNet infers, not the patient’s own shape. The sweep therefore isolates the network’s sensitivity to its shape conditioning. Because the reference surface, the reference labelmap and the acquired frames are identical across the grid, every combination is scored on the same evaluation grid and the figures are directly comparable point to point.
The all-zero combination is in the grid, so the unperturbed score comes out of the same code path as every perturbed one.
number_of_modes_to_vary,perturbation_rangeandperturbation_stepset the grid; the default is5 ** 2 = 25combinations, each costing one Tutorial 11 run.Read the sweep by the displacement columns rather than by Dice: a perturbed coefficient can leave a structure the same size in the same place and still move every point of it wrong, which the labelmap metrics cannot see.
- Run
python tutorials/tutorial_14_lung_shape_parameter_sweep.py

python tutorials/tutorial_14_duke_heart_shape_parameter_sweep.py
- Outputs
Under
tutorials/output/tutorial_14_<anatomy>/<case>/:shape_sweep_metrics.csvwith one row per combination, stage and structure,shape_sweep_summary.csvwith one row per combination carrying that combination’s pooled displacement error, and onecombo_<NNN>/directory per grid point holding its own Tutorial 11 style report, predicted surfaces and warped labelmaps.- Adapt to your data
number_of_modes_to_vary,perturbation_stepandevaluation_spacing_mmare the cost knobs — the grid is exponential in the first. Pointcase_idat a different subject to sweep that one instead.
Tutorial 15: Leave-One-Out Cross-Validation
- Script
tutorials/tutorial_15_lung_leave_one_out.py(TCIA-4DLung)tutorials/tutorial_15_duke_heart_leave_one_out.py(Duke-Heart-4DLabelmaps)- Workflow
WorkflowCreateMeanSurfaceandWorkflowCreateStatisticalModelper fold,WorkflowFitStatisticalModelToPatientper case,WorkflowTrainPhysicsNeModrivingTrainPhysicsNeMoMGN, andWorkflowEvaluateMovementon the held-out case.- Dataset
The whole cohort, and nothing else. Tutorials 6, 8 and 9 outputs are reused as a cache when they are present, but every fold builds its own shape model, its own fits and its own network.
- Requirements
Written for a multi-GPU Linux host, though it runs as a single process too.
- Preview
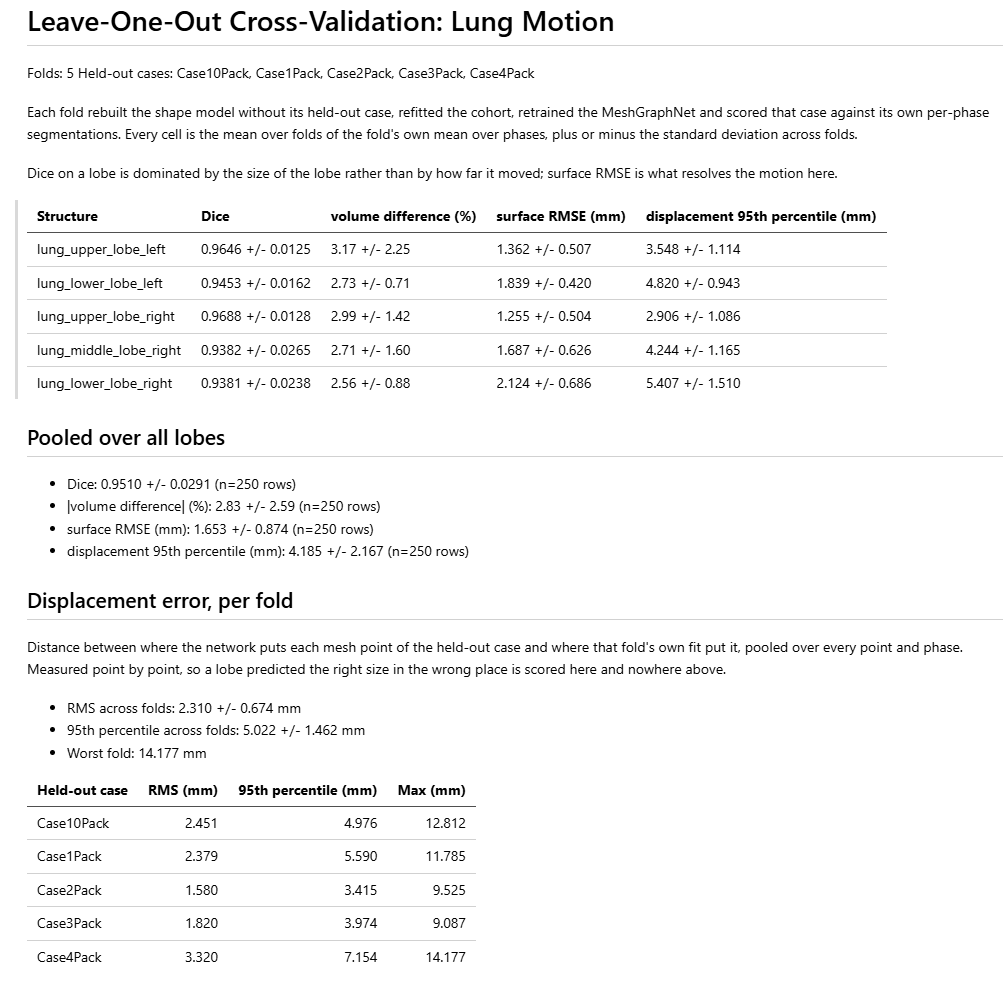
Held-out prediction error for each fold’s lung case, scored against that fold’s own PCA model, fits and network rather than one built from the whole cohort.
- What it does
Tutorials 6 through 11 report accuracy for one fixed held-out case, which is a single observation: it says nothing about how far the number would move had a different patient been held out. This tutorial runs that chain once per fold. Each fold rebuilds the PCA model from the population without its held-out case, refits the cohort to that model, retrains the MeshGraphNet on the other cases, infers the held-out case at every acquired stage, and scores it against that stage’s own ground truth. Rebuilding is the point — a model built once from everyone has already seen every case, so scoring against it measures recall rather than generalization.
number_of_leave_one_out_runsnear the top of each script sets the fold count and defaults to 5.Two things do not depend on which case is held out — the segmentations and, for the lung, the phase-to-reference image registrations — so they are computed once into
shared/and reused. Hoisting the registrations is what makes the lung variant tractable. The Duke variant cannot hoist its frame registrations: they warp the fold’s own fitted surface, which changes with the fold, so a Duke fold costs materially more than a lung one.- Run
# One process
python tutorials/tutorial_15_lung_leave_one_out.py
python tutorials/tutorial_15_duke_heart_leave_one_out.py

# Data-parallel training and rank-split per-case loops
torchrun --standalone --nproc_per_node=8 \
    tutorials/tutorial_15_lung_leave_one_out.py
torchrun --standalone --nproc_per_node=8 \
    tutorials/tutorial_15_duke_heart_leave_one_out.py
- Outputs
Under
tutorials/output/tutorial_15_<anatomy>/:loo_metrics.csvwith every metric row of every fold,loo_report.mdwith the per-structure mean and standard deviation across folds,loo_metrics_by_label.pngas the matching box plot, and onefold_<case>/directory per fold holding that fold’s shape model, fits, manifests, weights and evaluation.- Adapt to your data
Raise
number_of_leave_one_out_runsto the cohort size for a full leave-one-out study; the runtime is linear in it.epochsandbatch_sizemirror Tutorial 9 so each fold’s network is comparable to the one that tutorial trains — lower them for a quicker sweep, at the cost of comparability.
Tutorial 16: Build a Volumetric Shape Model of the Myocardium
- Script
tutorials/tutorial_16_duke_heart_physics_informed_motion_prep.py- Workflow
WorkflowCreateStatisticalModelwithsolve_for_surface_pca=Falseon a tetrahedral template built byextract_tetrahedra()andtrim_tetrahedra_to_surface(), thenWorkflowFitStatisticalModelToPatientper case and gated frame.- Dataset
Duke-Heart-4DLabelmaps, plus Tutorial 4 (duke heart)’s surfaces and, optionally, Tutorial 2’s finetuned distance-map ICON weights — the stock uniGradICON weights are used when absent, which understates the population’s variance. Nothing in Tutorials 1 to 15 is modified.
- Requirements
A CUDA GPU is required — every registration runs on one. This is the most expensive tutorial in the chain: an atlas pass over the population, one deformable registration per case for the model, then one fit plus one registration per gated frame per case, against a template far denser than the surface one. Every stage is cached, so a re-run only redoes what is missing.
- What it does
Tutorials 9 and 10 predict cardiac motion from a surface shape model, which has no interior and so cannot form a deformation gradient — the quantity Tutorial 17’s strain energy needs. This tutorial rebuilds the same model volumetrically: it builds the unbiased mean surface exactly as Tutorial 6 does, fills it with tetrahedra (holding every cell above a scaled Jacobian of 0.1), decomposes the population into shape modes against that tetrahedral template, and fits the model to every case and cardiac phase. Because every subject inherits the template’s topology, one set of element node ids stays valid across the cohort.
Only the reference mesh has to be volumetric: correspondence is established by warping it through each subject’s displacement field, which carries interior nodes along, while the samples merely supply the distance maps that drive the registration.
The last step writes one training manifest per case, naming each frame’s displacement from that case’s own fitted reference rather than the population mean — the physics residual Tutorial 17 trains against is measured at the fitted reference’s points, and measuring against the mean would charge every subject a strain energy for merely being shaped unlike it.
- Run
python tutorials/tutorial_16_duke_heart_physics_informed_motion_prep.py- Outputs
Under
tutorials/output/tutorial_16_duke_heart_physics_informed_motion/:ssm_template.vtu(the tetrahedral template),pca_model.jsonandpca_mean.vtu(the volumetric shape model),pca_mean_surface.vtp(its boundary, for display), one<case>/directory of fitted and phase-propagated models per case, andmanifests/for Tutorial 17.- Adapt to your data
ssm_element_size_mminparameters_duke_heart_physics_informed.pyis the one number that decides how much of the myocardium the physics term ever sees, becauseextract_tetrahedraresamples with a vote and drops any wall thinner than the element size. Measured against the 208,259 mm^3 the Duke mean surface encloses, the template holds 99.5% of it at 1.0 mm (305,696 nodes), 88.3% at 1.5 mm (100,903 nodes) and 72.1% at 2.0 mm (43,826 nodes); the default is 1.5 mm.
Tutorial 17: Train a Mechanics-Aware Cardiac Motion Surrogate
- Script
tutorials/tutorial_17_duke_heart_physics_informed_motion_train.py- Workflow
WorkflowTrainPhysicsNeModrivingTrainPhysicsNeMoPhysicsInformedMotion.- Dataset
Tutorial 16 output:
manifests/*_manifest.json,pca_mean.vtuandssm_template.vtu.- Requirements
A CUDA GPU is required. The mesh graph is several times larger than Tutorial 9’s surface one, so expect to lower
batch_sizeand leave gradient checkpointing on; training the ablation baseline (on by default) doubles the run.
- What it does
Trains the same MeshGraphNet architecture Tutorial 9 trains, on the volumetric shape model Tutorial 16 built, but scores it against a neo-Hookean strain energy as well as against measured displacement. Tutorial 9’s loss is L2 on displacement alone, so it has no opinion about motion no myocardium could undergo — an element may inflate, thin past what tissue allows, or invert outright, and the loss only notices to the extent the vertices land in the wrong place. A strain energy prices exactly those deformations. The loss becomes:
data + lambda_physics * (strain_energy + incompressibility)
with the strain energy of a compressible neo-Hookean solid,
W = (mu / 2)(I1 - 3) - mu ln(J) + (lambda / 2) ln(J)^2
evaluated from the deformation gradient of each tetrahedron via PhysicsNeMo Sym’s least-squares gradient reconstruction, its method for unstructured meshes.
The residual is measured against each case’s own fitted reference model, not the population mean: the targets are displacements from that reference, so it is the undeformed state. Measuring against the mean would confuse variation between subjects with deformation within one.
By default a second model trains on identical data with
lambda_physics = 0. That ablation is the only comparison that isolates the physics term — comparing against Tutorial 9 instead would confound it with the change from a surface shape model to a volumetric one — and Tutorial 18 scores the two against each other.- Run
python tutorials/tutorial_17_duke_heart_physics_informed_motion_train.py- Outputs
Under
tutorials/network_weights/physicsnemo_physics_informed_motion_duke_heart/(and..._ablation/for the comparison model): the trained checkpoint (physics_informed_motion_stage_model.pt), per-epoch loss (training_losses.json), and intermittent validation RMSE (training_validation_rmse.csv). Undertutorials/output/tutorial_16_duke_heart_physics_informed_motion/:training_losses.png, both runs’ loss curves.- Adapt to your data
mu_kpaandlambda_lame_kpainparameters_duke_heart_physics_informed.pyare the tissue’s constitutive parameters, andlambda_physicsweighs the residual against a displacement loss scored in different units — sweep it rather than trusting it. Settrain_ablation_baselinetoFalseto skip the comparison model.
Tutorial 18: Predict Myocardial Motion and the Stress It Implies
- Script
tutorials/tutorial_18_duke_heart_physics_informed_motion_infer.py- Workflow
WorkflowInferMovementdrivingWorkflowInferPhysicsNeMofor both models,WorkflowEvaluateMovementto score them, andConvertVTKToUSD(withcompute_von_mises_stress()) for the export.- Dataset
Tutorial 16 output (fitted models, manifests, template), Tutorial 17 output (the trained networks), and the held-out case’s
data/Duke-Heart-4DLabelmaps/<case>/*_labelmap.nii.gz.- Requirements
A CUDA GPU — same as Tutorial 17. Far cheaper than Tutorials 16 and 17: two inference passes and two evaluations over the held-out case’s gated frames, then one stress evaluation per frame.
- What it does
Scores the mechanics-aware surrogate Tutorial 17 trained, and turns what it predicts into something a mechanics-aware model can say and a data-only one cannot: a stress field.
It predicts the held-out case’s motion with the physics-informed network and again with the
lambda_physics = 0ablation Tutorial 17 trained on identical data — the only honest comparison, since scoring against Tutorial 9 would confound the physics term with the change from a surface shape model to a volumetric one. Both are scored withWorkflowEvaluateMovementinto one table comparing them per phase, including the minimum Jacobian, which says whether the predicted motion ever turns tissue inside out.It then derives the Cauchy stress each predicted deformation implies, from the same neo-Hookean law the training loss used, and reduces it to von Mises stress — the tutorial supplies only the 9-component stress tensor, and
ConvertVTKToUSD.compute_von_mises_stressderives the scalar — before exporting the animated result to USD with a stress colormap.The success criterion worth holding this to is not that the physics-informed model wins on RMSE. It is that it is no worse while keeping every element’s Jacobian positive: a strain energy is a prior, and a prior that improved the data fit would be suspicious. Read
mechanics_comparison.csvand report what it says.- Run
python tutorials/tutorial_18_duke_heart_physics_informed_motion_infer.py- Outputs
Under
tutorials/output/tutorial_18_duke_heart_physics_informed_motion/<case>/:mechanics_comparison.csv(per-phase scores, both models),physics_informed/andablation/(each model’s predictions and report),stress/<frame>_stress.vtu(predicted motion carrying stress), andheart_physics_informed_motion.usd(animated, colored by von Mises stress).- Adapt to your data
Point
case_idat a different held-out subject to score that one instead; everything it reads comes from Tutorials 16 and 17, so no other change is needed.
Where to Go Next
Viewing USD Files - installing an Omniverse Kit application and opening the scenes these tutorials produce.
Bring Your Own Data - DICOM, Images & VTK to USD - running the workflows on your own DICOM, NRRD or VTK data, including directory layout and conversion.
API Reference - every workflow, segmenter, registrar and utility class.
Architecture - how the workflow layer fits together and where to extend it.
Testing -
tests/test_tutorials.pyruns these scripts end-to-end behind the--run-tutorialsflag.